In all seriousness, though, I'm so happy to have been asked to contribute. Really a great experience and I've been thrilled to see how many people love this issue.
One thing, though, that I'd like to correct. On page 35 I am quoted as saying that I created my Little Rock dress study in Photoshop "with a variety of digital painting methods." Yup, that's what I said. And you know what? I think I can do better than that! So today, we're going to take a look at how I made that dress.
First, I start with a super rough sketch. I made this quickly, with no reference, so don't judge me too harshly!
I scribbled this in ArtRage, which has become my sketchbook, really. I still draw on paper, but more often, it's in ArtRage and then on to whatever I need (more ArtRage, Photoshop, Illustrator, etc). In this case, I'm using Photoshop.
Here's the file in Photoshop. My bottom layer is just a white layer so that I can see what I'm drawing. Above that at 50% opacity is my sketch. And above that is my lines. I use a custom oval brush to draw my lines but you can really use whatever you're comfortable with. I like a slightly tilted oval shape to create some of those naturalistic line tapers. It's important NOT to draw right on top of the sketch.
Once your lines are drawn, use the Magic Wand tool to select OUTSIDE of the lines. You need to make sure that your lines are closed or this won't work. If you find any gaps, fix them and select again. Once the outside is selected, go to Select>Select Inverse. This will select the interior. While your selection is still active, go back to Select>Modify>Contract and make it 1px. This will prevent either blank pixels inside the fill or bleeding over the lines. It isn't strictly necessary, but it keeps my art a little cleaner, so I do it.
Now that the color is blocked out, we're going to take a slight detour and create a seamless pattern fo the glittery parts of the dress. Again, this isn't strictly necessary. You could just draw squiggles on a new layer and call it a day. I like to create a seamless pattern so that's what we're going to do.
Create a new file in a square format. Mine is 900 pixels square. I find using a square format is the easiest way to create a seamless pattern but it certainly doesn't have to be a square.
Add a layer above the background layer and draw some squiggles. Once you're happy with that, go to Filter>Other>Offset filter.
Enter in HALF of your canvas size in the horizontal and vertical values. I use 450 pixels because my canvas is 900 pixels. Click on OK and go back to your image. If you have obvious gaps (it'll look like a white cross running through the middle of your image), then draw in more squiggles in the gap. When you're happy with that, turn OFF the white layer, select all of the squiggle layer, go to Edit>Define Pattern. Now you have a squiggle pattern for your dress! Go back to the dress file to use it.
You can apply your pattern a few different ways. I'm going to apply mine as a clipping mask. Photoshop doesn't allow for multiple pattern fills in the Layer Effects menu, and, ultimately, I want to add a pattern (glitter) to this squiggle pattern. Using a clipping mask is a pretty good way to do this.
Add a new layer, using the paint bucket to fill the layer with the pattern. Remember how I said to turn off the background layer before creating your pattern swatch? This is why. The background of the pattern needs to be transparent. Right-click on the pattern layer and choose Create Clipping Mask. This hides all of the unnecessary parts of your pattern and you can adjust the pattern layer with the Move tool (scale, rotate, etc) until you're happy with it.
Now here's the fun part!
I'll use the Layer Effects menu to make this all glittery. With the clipped pattern layer selected, click on the little FX button in the Layer panel. Select Pattern Overlay. If you don't see all of the other layer options, just click on the FX button and select show all.
I'm using a glitter pattern that I made in ArtRage, but there are loads of resources available. There are free glitter patterns here and paid patterns here. (Just as an aside: I do NOT get paid to recommend products or anything. I'm suggesting these because I use them myself & I'm happy to share them.)
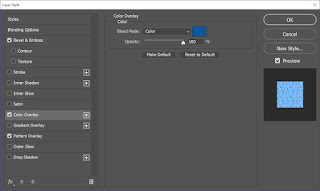
Next, add a color overlay in the same color as the dress. I select Color as the blend mode. This give the glitter layer a slightly lighter blue than the dress. Play around with the blend modes until you're happy with the results.
Finally, I like to add a small, hard bevel to the pattern layer. It makes the pattern look slightly raised and I like the effect of that.
And that's pretty much it. Sometimes I'll make the dress fill a gradient. In the Little Rock example, I also added a highlight layer where I used a starburst brush to create the sparkly bits. It can really get as complex as you'd like (or have the patience for!!). I suggest keeping each part on its own layer (color fill, pattern, highlight, shadow, etc).
On Monday I'll have another Sarah set ready to go so look for that. Any questions about this tutorial, feel free to let me know!


I'm always fascinated at how differently people use the same programs. What a fun project.
ReplyDelete