Wednesday, December 21, 2022

Happy Holidays!

 It's the first day of winter here in the frigid Northern Hemisphere. Seems like the perfect time to share this year's holiday card! 

Right-click to download and print

This year's card was inspired by the Glitter book I worked on with David Wolfe and the 1980s. If the doll looks familiar, it's because I reworked the Halloween Witchtober doll for this one. I really wanted something bold and bright. This has been a better year for a lot of us and I wanted to celebrate that.

I also helped David create his holiday paper doll based on the movie "White Christmas". It's always fun working on David's projects but this one especially. It's one of my favorite Christmas movies, My abilities have grown leaps & bounds in no small part because I the work I do with David. He's been in my thoughts so much recently. 

You can grab the two-page set on the Paperdoll Review Facebook page as a PDF download. 

For more holiday fun, you can grab last year's holiday paper doll here (even though it posted in 2022, I made it in 2021). AND the 2020 holiday paper doll is here (with the Nora and Nellie book I created from it here). 

That's a lot of holiday cheer! Whatever you celebrate, I hope it's excellent!

Tuesday, November 29, 2022

2023 Calendar

 I'm currently working on my holiday card, so that will post soon. In the meantime, I finally took the 2018 Doodle-a-Day project and turned it into a calendar! You can grab it here. It took about three weeks to receive my copy, so plan accordingly! You can also take a look at the whole project (and print them out at home) here.


Monday, October 31, 2022

Witchtober - Merchant, Travel, and Wrap-up

 First up, happy Halloween! I totally, absolutely LOVE Halloween. My kids do, too. What's more fun than dressing up, going out at night, and getting candy with your friends?! Nothing, that's what! 

Right-click to download and save full resolution image

It was tough fitting both of these on one page! My merchant witch is a sort of Venetian style costume. I wasn't sure how to represent shopping or selling or whatever a merchant does. I settled on bag on a belt and hanging potions. The travel witch, too, was a bit tough. I thought a steampunk inspired/early automobile outfit might work. Anyway.... It's been a fun series to work on! Make sure to check out Rachel's, too, over at Paper Thin Personas. It's always a blast working on paper dolls with her! 


Monday, October 24, 2022

Witchtober - Winter and 18th Century Witch

Week 4 of our Witchtober project! Next week will be the last week and we'll post on Halloween. This has been loads of fun...and hard to keep up with! Sometimes I look through my old projects and I wonder how I ever had the time! That 2018 doodle-a-day? WOW! There were 63 sheets in that collection with 4 different dolls. 

Right-click to download the full resolution images

I got a little carried away with the winter set! I'm learning more and more about Procreate every day. One thing I'm working on is custom brushes. The holly is a brush I made. Still tinkering.... The 18th century dress is a little slim but I knew I was running out of space on the page. I made a pumpkin brush for that pattern, too, and I'm not sure how I feel about that one. If I color these, I'll probably approach both of those differently.

 Rachel is on track to post hers a little late this week. Watch her blog for it.  I know I'm looking forward to seeing it!


Monday, October 17, 2022

Witchtober - Sea and Kitchen Witch

 I know my post went up a little bit late today. I got a bit caught up drawing all of the Rococo inspired goodness on my Sea Witch!! 

Right-click to download and save the full resolution image

I didn't set out to make a Rococo gown. After looking for inspiration, I found a seashell crown that I liked so that inspired the hat. And as I was drawing the hat, I liked the idea of those tube curl things on powdered wigs.  That lead to a corset style front...and things just got out of hand from there. (TANGENT: My family and I are Marvel fans. In Doctor Strange and the Multiverse of Madness, one of the characters says "Things just got out of hand". It's Benedict Cumberbatch with a glorious evil voice and we say this exact phase around my house all the time!)

So anyway... After the Sea Witch, I tackled the Kitchen Witch. When I hear that phrase, I think of things like Practical Magic (wonderful book - go read the whole series - and an excellent movie) and "ordinary" witchy folks, not your goth leaning folks. I love a good goth aesthetic, but not all witchy folks are goth. So I went with a sort of retro cardigan, foliage patterned skirt, and an apron with a wooden spoon and herbs.

Monday, October 10, 2022

Witchtober - Bone and Bird Witch

 I'll admit, things never seem to settle down in my house! I've been helping my mother with her knee surgery. My boys are both in middle school now (!!!!!!) - one is having a tough transition but we're working on it. I feel like I have a million things going on any given day. 

I wouldn't trade it for anything. Ok, maybe for just a tiny bit of quiet. 

Today's Witchtober set is a Bone Witch and a Bird Witch. I was partially inspired by a pearl ribcage jewelry thing for the Bone Witch. And some rad shoes with spines for heels. The Bird Witch is all me. I had this idea of a one-shoulder swoopy kind of thing. I'm not completely happy with how the skirt turned out but I can live with it. Take a look at Rachel's interpretation here!

Right-click to download full resolution image

The boys have today off, like many of us in the States. We're going on a bike riding adventure. 

If you have the day off, too, have fun coloring the Witchtober witches! Make sure you grab the first one here :)


Monday, October 3, 2022

Spooky Month and a Halloween Paper Doll

 My youngest son is totally into Halloween this year! We all are big Halloween fans most years, but this year, he is REALLY into it! We drew monsters together over the weekend.


Today, however, is a paper doll kind of day! 

Right click on the image to save it at full resolution.

Rachel and I decided to embark on another Halloween paper doll project. We're tackling a few of the themes from this Witchtober list we found here: https://juanjoltaire.tumblr.com/  I know nothing about the artist but this list is great.

Today's paper doll is the base doll and a random outfit. It's sort of based on a vintage Halloween dress that I saw, so it isn't part of the theme list. 
Rachel and I are going to tackle the same themes and post on Mondays through Halloween. It's going to be fun to see how we interpret the same ideas differently! Check in every Monday through Halloween to see what we're up to!


Friday, September 16, 2022

Queen Elizabeth II Paper Doll in Tartans

 August came and went in a blur! Our Disney vacation was a ton of fun. The kids LOVED it! It was hot. It rained. We walked a zillion miles a day. I destroyed my phone and my husband lost his credit card. My parents lost a piece of luggage (it was found!). But it was all worth it and it was super fun. Here's a goofy selfie to prove it! 

Anyway.... 

The next issue of Paperdoll Review is all about plaids and checks. I was going to make a retro mod doll with some fun plaid outfits but it just wasn't coming together. 

And then the Queen died.

I'm a low-key royal watcher. Not like obsessive or anything. My mother is close in age to Princess Diana and watched the wedding in the 80s with great enthusiasm. I'm about the same age as Prince William. I find the history of it all fascinating. So once the Queen's death was announced, I felt compelled to draw her for the magazine. 

Her last official photo showed her at Balmoral in a tartan skirt and sweater. I knew from my own Scottish ancestry that tartans have their own histories and restrictions, much like coats of arms. There's a Scottish Register of Tartans that is just terrific!  It has lovely samples and information about each tartan, which was a key part of creating this doll. Here I discovered that the Queen's tartan is the Balmoral tartan, exclusive to the royal family. I used that on my base doll.

Next, I wanted another tartan from the Queen's time at Balmoral. She seemed to favor tartans while in Scotland so there were loads to choose from. I wanted something from her later years so that it would be consistent with the doll. The green tartan in this image is another royal exclusive and that's why I went with it for my outfit.


The other key part of my paper doll is Balmoral Castle. It was a favorite residence of the Queen and where she spent her final days. I found a lovely image on Wikipedia which was especially great because it's a Creative Commons image that I can freely remix! I tried working with it in Photoshop but to get the effect I wanted, I ran it through a watercolor painting simulation process in Photoshop.


So essentially I took all of these elements, about 5 hours in Procreate with another hour or so in Photoshop, and created my Queen Elizabeth memorial paper doll. Here's a 30 second time lapse video so you can get a sense of it.


There's also a wonderful write-up about the Queen on Jenny's paper doll blog with a link to a full resolution PDF of my paper doll. Go check that out, too.


Friday, August 26, 2022

Summer Vacation

 My family and I are on our summer vacation at the moment. I'll give you all one guess to figure out where we are....


I LOVE Mabel and Gravity Falls is a family favorite so I dug out the ol' file and updated it. Feel free to download it for yourself. Personal use only fanart... you all know the drill!

Friday, August 19, 2022

How to Make Plaids and Checks

 I skipped writing last week. I'm trying to get back into a once-a-week posting schedule but it doesn't always happen. This week, I want to share some ways to make plaids and checks. If you're a subscriber, you'll know that the next them is plaids and checks. (If you aren't a subscriber, you can become one here.)

I'm going to create my plaids and checks in Photoshop but these techniques should work in other similar programs. I also have a tutorial from 2015 that's fun for "complex" plaids so check that out. Let's start with checks.

In Photoshop, create a new square canvas. Mine is 3inches square. Using the Shape tool (it's the little rectangle icon), create a square that's half the size of your canvas. To do this, click once on your canvas and a menu will pop up. Type in your dimensions. You'll have exactly the right sized square and it'll look something like this: 

In order to make this a checkered pattern, I need two squares aligned to the top left and bottom right corners of my canvas. To get this perfectly aligned, I use the Alignment tool. Select your square. Click on the three dots (circled in the image) and select Canvas. This aligns your shape to the canvas, not to other objects or shapes. Select Left and then Top (1 and 2 in the image).

So now there's one half of the pattern. Do the same thing for the next square but instead of selecting Left and Top, select Right and Bottom. You'll have something that looks like this:

Now I want to make this a seamless pattern. To do that I first rasterize the squares. Right now they're a vector shape. Right-click on the layer and then click on the Rasterize Layer option. Merge these two squares into one layer for a transparent pattern, merge all the way with the white background for a solid black & white pattern. I want mine to be transparent so I'm going to turn the visibility of that layer off by clicking on the little eyeball.

Select the whole canvas and go to Edit>Define Pattern. A little menu will pop up where you can name your pattern. I called mine "transparent check". If you don't do this, it'll have a sequentially numbered name (mine was Pattern 758) and that's just useless.

Click OK and there's your pattern! You can use this with the Fill tool (bucket) or as a Layer Style (fx) or as a Pattern Fill layer in the Adjustment Layers panel. I'll use it as a pattern fill layer on a new canvas to test it out. 

In your Layers menu, click on the half black/half white circle icon to open the Adjustment Layers panel and select pattern (circled). You'll get a menu of patterns. Since this is my newest pattern, it's the last one WAY at the bottom. Click on it and tinker with it. I changed the scale of mine.


 And that's it! You can use the pattern with a clipping mask. You can add it to an existed layer and change the opacity or layer styles like multiply or screen. 

Creating a plaid is only slightly trickier. 

To start, I'm going to make a rectangle that is the same height as my canvas. It can be any widths. Right now, mine is 1in by 3in. I'm going to align it to the right and center using the method from above. Now I'm going to make a few rectangles of various widths but all of them will be 3 inches tall.

Here are my rectangles. Each one is the same height as the canvas and they're all aligned along the center. At this point, I rasterize each layer. Then, selecting all four layers in the layers panel, I duplicate the layers. While they are still selected, rotate them 90 degrees.


It's starting to look like a plaid! I have one set of vertical stripes and one set of horizontal stripes. I'm going to change the opacity of the horizontal stripe and test my pattern. Select all of the layers that you want in the pattern and go through the steps from above.


It's not the most exciting plaid ever but it works. 

Now here's where the fun starts! Go back to the original file and change the colors of the rectangles. You can make it as colorful as you like! 

Once I added my colors, I decided to change the opacity of the vertical strips to 75%. It makes for a more realistic pattern. I tested it with a Pattern Fill Adjustment Layer. And I changed the angle to 45 degrees.


And that's it! There are so many ways you can arrange rectangles to make plaids. Here's one more plaid and the tile I made to create it.

These are simple plaids. You can get far more complicated if you'd like! Look for inspiration, too, and just break down plaids into square patterns. And have fun with it! 

AND...you can save these patterns as JPGs to use in other programs, like Procreate. I do that all that time! 

Happy plaid making!!


Friday, August 5, 2022

Hometown Girl - Paper Doll and Process

 A few months ago I picked up an iPad Pro and Procreate. I've been experimenting ever since. Recently, I discovered that Procreate automatically records a time lapse of my drawing! So today, I'm sharing a quick speed paint video and the final paper doll. 

I don't have a lot of experience with video so forgive me if it isn't great! This doll - Hometown Girl - is something I made for a local newspaper. There's a recurring column about locals and I happened to be in it. 

The doll is dressed in a swimsuit to represent our local hidden gem, Forest Lake. She has a Methuen Rangers shirt for cheering on our local high school. Next up, a sparkly holiday set that represents our amazing Methuen Festival of Trees, which benefits numerous historical preservation projects. And finally, a flannel perfect for studying at the Nevins Library, a gorgeous brick library in the center of town. 

Feel free to right-click and download my Hometown Girl and print one out for yourself! What would your hometown girl look like? Maybe I'll make a whole series!


Friday, July 29, 2022

Vintage Julie Paper Doll

I loved two things specifically about the recent paper doll convention: all of the people are AMAZING and the variety of paper dolls I got to see was unbelievable! 

One of my paper doll pals found a vintage paper doll named Julie for me! 

How cute is that?! It even looks like me! Here's me on my fifth birthday with my very rad Barbie house & car (and in my favorite dress). You can't tell in this very '80s photo, but I have bright blue eyes just like our little vintage Julie paper doll.


It was unopened but I'll admit, my curiosity got the better of me. With permission from my favorite archivist (thanks Rachel!), I carefully opened it. I'm glad I did! The cellophane essentially disintegrated in my hands. The staples came out easily, thankfully. Inside, there was a sheet of cardboard which I am quite sure is not acid free. After taking it apart, I scanned all of it. 


The paper doll has 5 pages of outfits, four on the inside and one on the back cover. They are really bright! On the pages above, the only editing I did was to color correct the white background. It was slightly grey but not at all yellowed. 

In my very rudimentary research, I found that this is a Queen Holden illustration. It was issued and re-issued several times throughout the 1960s. Julie also had companion Trudy and Vicky paper dolls. This set isn't super valuable, another reason why I felt pretty good about opening it. 

And just for fun, I created a one page printable. I did a little bit of color correcting, some slight fit correction, and added cleaner tabs. Feel free to print it out and have fun playing!


Friday, July 22, 2022

A Long Break and a Convention

 I know, I know.... It's been a million years since I wrote on the ol' blog! It's been a hectic year after such a quiet couple of years... 

March was full of kid stuff including a bunch of birthday parties. In April, we took a vacation to the Poconos in Pennsylvania - we went to an indoor water park for the second time! SO FUN! May and June are always hectic, with Mother's Day, Father's Day, end of the school year stuff, and so many birthdays... 

Which brings us to July! And my first Paper Doll Convention!! 

I traveled to the convention with Jenny from Portland. First, I hate flying out of Boston and second, it's more fun to travel with friends. We had uneventful flights (thankfully!) and arrived in plenty of time for the Mad Hatter's Tea Party. That was the big event/dinner for the first night. There were some technical glitches but overall, it was fine. The souvenirs were Mad Hatter themed. Kwei-Lin Lum, Cory Jensen, and I were all featured. 

My pictures are not great! There are tons of great pictures on the Paper Doll Convention Chatter Facebook page. Also, I was so busy having fun that I didn't even take many pictures! 

The next day there were several things going on. I listed to Kwei-Lin give a talk about women's suffrage ephemera. Teri Petit gave an overview of Donald Hendricks which was great. Eileen "Rudy" Miller gave a really wonderful talk about her career, too. Once the day's activities were over, it was time for dinner and the artist's gallery. I set up my iPad and gave demonstrations of how I draw on that.  The souvenir from dinner featured my art on the cover and a variety of chapter book characters with art by Marilyn Henry, Karen Hunter, Guillem Medina, Patricia Corte Rooney, Andrea Helen Smith, and Tracy Williams. It's a lovely book with a large variety of subjects and artists! 


Another one of my dreadful pictures... 

That image from the cover was everywhere! Jill (who hosted the convention) used it on so many things. I was just delighted to see all of the clever uses all over the place.

Friday was the sales room day! 

Jenny and I shared a sales table. I brought prints and self-published books as well as my newest book, Miss Hollie Day. You can grab it here. It was fun and tiring and great. I ended up mildly dehydrated! My mission in the sales room was to acquire originals to frame for my new office. I snagged a lovely watercolor from Norma Lu Meehan and a fashion drawing from Rudy Miller. After the sales room, we had a roaring time during paper doll trivia! I knew exactly one answer. We all were in hysterics. It was super fun! 

On Saturday, I went to the Milwaukee Museum of art with Rudy Miller, Norma Lu Meehan, and her daughter Mary Meehan Firtl. It was lovely. The museum is a stunning monument to the Great Lakes and resembles a ship. The main exhibit featured the posters of Jules Cheret. Once we got back to the hotel, I was on a panel with Teri Petit and Sylvia Kleindinst ("Jenny and Friends") to talk about three different generations of paper doll enthusiasts. The last question Jenny asked was about how paper dolls have impacted our lives. At that point, I kinda lost it. I've had a few bouts with depression. I started this blog to cope with post-partum depression even though it took years for me to share that here. And it helped my deal with being a caregiver for my grandmother, the pandemic, and so much more. I got weepy talking about it. And then the whole room got weepy listening to me talk about it! I'm in awe and humbled by how much my story resonated with everyone. It really hit me deeply and I will carry that moment with me always. 

Next up was the raffle room! That was another fun event! I'm not a huge collector but there were a few things I really, really wanted! I one THREE things! Two things were piles of childhood-themed paper dolls. One of those I wanted specifically for a Peck-Aubry Anne of Green Gables that I've wanted since I was a teen! Jenny found a copy, too, so now I have both the book and the unopened, larger doll set.

Another stack of children's paper dolls featured a terrific Red Riding Hood. I absolutely love Red Riding Hood and the very, very long history of the folk tale (you can see one that I did that I really need to update here). And I got it! 


This is a great set! The art is cool and the format is even cooler! On the left of every page is the story and on the right is a set of outfits. Even if you cut out all of the outfits, you still have a narrow story book. It a fantastic layout. 

Finally, I won a set of Outlander paper dolls by Rudy Miller. I don't have a picture of them handy. They are AMAZING! I love Outlander, I love Rudy's art, and I'm beyond thrilled to add it to my small but growing collection.

Sunday was our travel day. Jenny and I flew home together. We got into Portland late so we crashed at a hotel ear the airport. I slept more in that one night than I slept in the whole week of convention! There were so many people to see. I'd stay up late chatting. I'd get up early for coffee and chat with a whole different group of people. It's an experience unlike any other. There are no firm plans for another convention but there will be an East Coast party in May. Find out everything here.

I'll have more to share about the convention in the coming weeks. It was a joy to meet so many wonderful paper doll pals!


Friday, February 11, 2022

Valentine's Round-Up

 I rarely create round-up posts but I was inspired by Rachel's delightful round-ups so here we are. (She has a LOVELY book out - grab it here. I have a copy and it's so pretty!!) 

Unlike Rachel, I have not created oodles and oodles of lovely dolls for all occasions. But here's what I've got, in no particular order. With all of the following images, click on the image, then right-click to download and print.


Kawaii Kids - Birds and Hearts

Starting in 2013, I made a bunch of Kawaii Kids paper dolls. It started as a December Daily Doll and spiraled from there. I'm not actually sure how many there are total.... This one isn't specifically Valentine's themed, but it has some cute hearts to color.


Also from roughly a million years ago, a Valentine's set from my short-lived Paper Jane sets. This one never fully clicked for me. Her arms are too long and her hands are too book, but it still has a bit of charm to it. 


From my toddler series, here's Charity dressed for Valentine's! The toddlers were an extension of my Fashion Friday paper dolls. I've since compiled a bunch of toddlers into a book that's available here. If you search the blog for Valentine, there are a few other sets in the various Fashion Friday posts.


And finally, a sort of new paper doll. In 2018, I undertook a very ambitious project where I followed a doodle-a-day prompt. It was tough! I finished it, and it's one of my favorite series. I'd like to go back through and fix some things (HELLO TINY TABS!!) and print them up. The two "Sweetheart" pages are a compilation of the February 2018 series.

That's it for now. Happy paperdolling :)


Friday, February 4, 2022

Special Effects in Sketchbook

I hope everyone had a better January than we did! We all got sick with something but we're all 110% now. Between a never-ending cough and a blizzard, it was a challenging month! 

I'm feeling much more positive and motivated now. Days are getting a tiny bit longer and less cold. The kids, too, and getting past the blahs of January! 

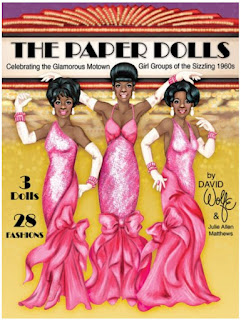
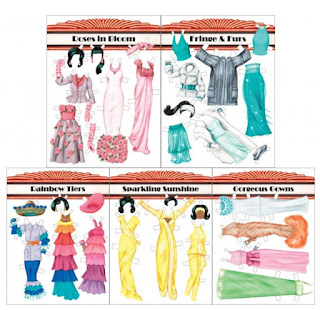
Last year, I was lucky enough to work on another project with David Wolfe. He came up with a wonderful Motown inspired paper doll book and I added a bit of digital sparkle. Today I want to share some of the techniques I used in that book. (You can grab a copy from Paperdoll Review)


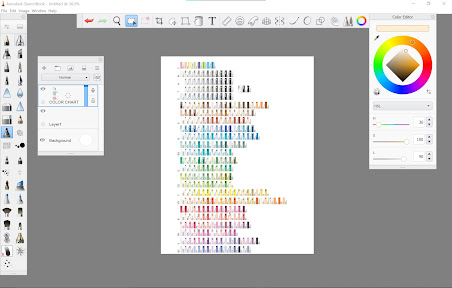
I've been experimenting with different digital art apps & programs. Photoshop has been just dreadful for coloring! It's terrific for a lot of things - coloring isn't it. I find I really love Sketchbook. The interface is easy to understand, the tools are fantastic, and it doesn't crash repeatedly. The only downside is color management.  Sketchbook became its own company separate from Autodesk. As a result, the Copic color swatches are no longer available, a feature I really loved. And the color wheel/color swatch menu is not great. As a work around, I add a layer as a color chart and just grab from there as needed.

Ok, enough about that. Time to give your project some sparkle & shine! 

The pictures below are a little small, but if you click on them, you can see them in all of their full sized glory!!

Here's my desktop. I'm using a legacy version of Sketchbook, but the version available now is very, very similar. I grabbed it from the Windows store & I can go over the differences at some point. Anyway, I have a layer with my color chart, the color wheel, and some of the brushes I use. 

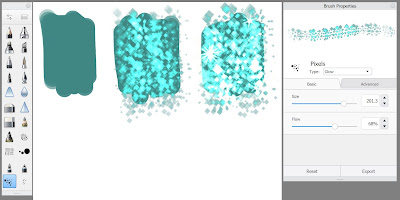
First up, let's look at how to make square sequins. 

I start with a flat color. I tend to use the Paint Tapered brush to lay in flat colors. The default brushes in Sketchbook at great, but if you feel like you need ALL the brushes, there's a huge list of free brushes here. Although Sketchbook is available for pretty much any device, not every device has every feature. These ONLY work in the desktop versions, either Windows or Mac.

Once the flat color is down, I use the same color as the base and select the Pixels brush. You can make your sequins any shape you like, of course, but this works for me. In the Brush Properties menu (it's the little slider at the top of the brush palette on the left), set the Type to Glow. Then draw over your color swatch. Glow is my absolute favorite thing about Sketchbook! In the third swatch, I built op a couple of passes with the Glow Pixel brush and then added a couple of sparkles. You can experiment with colors, gradients, etc. 

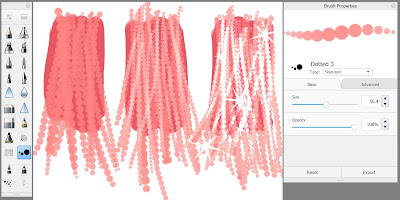
Next up, let's look at some shiny beads!
Again, I start with a flat color. In both cases, I start with my darkest color. It's the anchor for all the shiny bits on top. For the beads, I use the Dotted brush. Sometimes, I use the Advanced tab on the Brush Properties to adjust the distance between the beads, the size, and the taper of the brush. That tapering is pressure sensitive so the lighter I press on my stylus, the narrower the bead string becomes. The first swatch has the next lightest color. In the second swatch, I kept the color the same and changed the Type to Screen. That makes it a bit lighter and a bit transparent so I can start building up layers of beads.  In the third swatch, I kept the color and switched the type to Glow, and then added a couple of sparkles. 

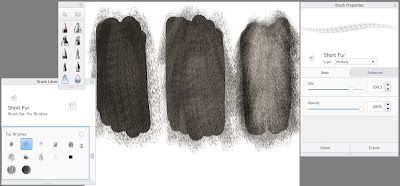
Finally, let's look at a bit of fur. 


Yet again, I start with a flat color of my darkest tone. There are a bunch of fur brushes available in the Brush Library - that's the line with three squares in the top of the brush palette. I'm using the Short Fur brush here. On the first swatch, I set my color Screen and color over the flat color. The second and third swatches are the same color, same brush, but I build up tones & variations by switching between Screen and Multiply in the brush type. 

Sometimes, after I use these basic techniques, I might go back with a different color for shadows and highlights. In digital or traditional media, I always start with three basic tones: light, medium, and dark. In watercolors, I build up the same color in layers. Same thing here it's just that my medium or dark tone is my base color, lights are created using Screen and any additional dark tones are Multiply. And Glow is my secret to extra shine!! 

Sketchbook is a really great, easy to use drawing program. It's about $20 USD in the Windows store (I bought it myself - no one paid me to say it's awesome!) It has its flaws, of course, but it's really wonderful to work with and I would recommend it to digital artists of any level.