Monday, October 30, 2017

Sarah's Simple Wardrobe - Set 4 Black and White

Tomorrow is Halloween! I love Halloween.  This year, my dad is passing out candy at my house with my grandmother (who just moved in with us), while my husband is going out trick-or-treating with me & the kiddos.  Should be fun!! If you're looking for Halloween paper dolls, there are a bunch here.

For today, Sarah is getting some casual clothing to mix and match.

Right-click to download and print

Those are supposed to be jeans and a jean skirt, but go ahead and color them however you'd like!  On Friday (which is somehow NOVEMBER! When did that happen?!), I'll have the color version posted. 

Til then, have a happy, safe, fun Halloween!!

Friday, October 27, 2017

Paper Doll Collaboration 2017 - Vampire

Autumn is the reward we in New England get for putting up with the other three seasons here, and this year is no exception. I love October - I was married in October (ten years ago, in fact!!).  It's a great time of year.

And Halloween! Who doesn't love that?! My kids and I are really excited about Halloween.  It's easily my favorite holiday of the year.

So this month, we have some spooky additions to the collaboration paper doll.


Let me first say that this was a feat of formatting finesse! It was not all going to fit.  I was just sure of it....and then, somehow, it did! So I'm pretty happy about that. And the crazy ruffles.  I just love drawing ruffles right now!

For more haunting costumes, check out Paper Thin Personas, Pop Culture and Paper Dolls, and Miss Missy's Paper Dolls.

Friday, October 20, 2017

Sarah's Simple Wardrobe - Set 3 Color

I've got another color sheet for Sarah and her expanding wardrobe! Sarah has been fun - much simpler and less fussy than some of the previous projects.  Not that I don't love them (Josephine is great and I'll probably go back to that at some point) but sometimes it's nice to have a simple project.

Right-click to download and print

I loved that grey pattern so much I used it twice! The colors for this set are really nice & I enjoy working with them every week. It's nice not to think about color at all, to just use a limited set and that's that.

Also....I mentioned on Monday that I've been working on the December dolls.  Yup. Dolls.

I'm tentatively calling these Little Ladies and they're getting frilly Victorian/Edwardian frocks for the month of December.  They're probably going to be black & white but it really depends on what kind of progress I can make on them.

You have to wait til December for those but come back Monday for more outfits for Sarah!

Monday, October 16, 2017

Sarah's Simple Wardrobe - Set 3 Black and White

Happy Monday! I'm not a Monday hater.  Some people are -- my kids sure are! But me...I never really had a problem with Mondays.  In fact, I kind of like the beginnings of things, enough so that sometimes finishing things becomes problematic!

This week I have both started and finished something, so that's good!

Right-click to download and print

Today's set features a dress, something I don't do very often.  I love mix and match wardrobes and a dress doesn't fit well with that concept.  I figured that this is going to be a large enough set to accommodate a dress or two.

Friday I'll have the color set ready to go.  I'm trying to get ahead on this set because I've already started the December set!! Let me know if anyone is interested in a preview.....!

Friday, October 13, 2017

Tutorial: How to Make a Sparkly Dress in Photoshop

Did everyone get their copy of Paper Doll Studio magazine?  If not, you can grab it here.  I highly recommend it -- that cover artist is a pretty cool lady from what I hear!!

OPDAG - Paper Doll Studio Magazine Issue 118 - Click Image to Close

In all seriousness, though, I'm so happy to have been asked to contribute.  Really a great experience and I've been thrilled to see how many people love this issue.

One thing, though, that I'd like to correct. On page 35 I am quoted as saying that I created my Little Rock dress study in Photoshop "with a variety of digital painting methods."  Yup, that's what I said.  And you know what? I think I can do better than that! So today, we're going to take a look at how I made that dress.

First, I start with a super rough sketch. I made this quickly, with no reference, so don't judge me too harshly!

I scribbled this in ArtRage, which has become my sketchbook, really.  I still draw on paper, but more often, it's in ArtRage and then on to whatever I need (more ArtRage, Photoshop, Illustrator, etc).  In this case, I'm using Photoshop.


Here's the file in Photoshop.  My bottom layer is just a white layer so that I can see what I'm drawing.  Above that at 50% opacity is my sketch.  And above that is my lines.  I use a custom oval brush to draw my lines but you can really use whatever you're comfortable with. I like a slightly tilted oval shape to create some of those naturalistic line tapers.  It's important NOT to draw right on top of the sketch.

Once your lines are drawn, use the Magic Wand tool to select OUTSIDE of the lines.  You need to make sure that your lines are closed or this won't work.  If you find any gaps, fix them and select again.  Once the outside is selected, go to Select>Select Inverse.  This will select the interior.  While your selection is still active, go back to Select>Modify>Contract and make it 1px.  This will prevent either blank pixels inside the fill or bleeding over the lines.  It isn't strictly necessary, but it keeps my art a little cleaner, so I do it.

Now that the color is blocked out, we're going to take a slight detour and create a seamless pattern fo the glittery parts of the dress.  Again, this isn't strictly necessary.  You could just draw squiggles on a new layer and call it a day.  I like to create a seamless pattern so that's what we're going to do.

Create a new file in a square format.  Mine is 900 pixels square.  I find using a square format is the easiest way to create a seamless pattern but it certainly doesn't have to be a square.

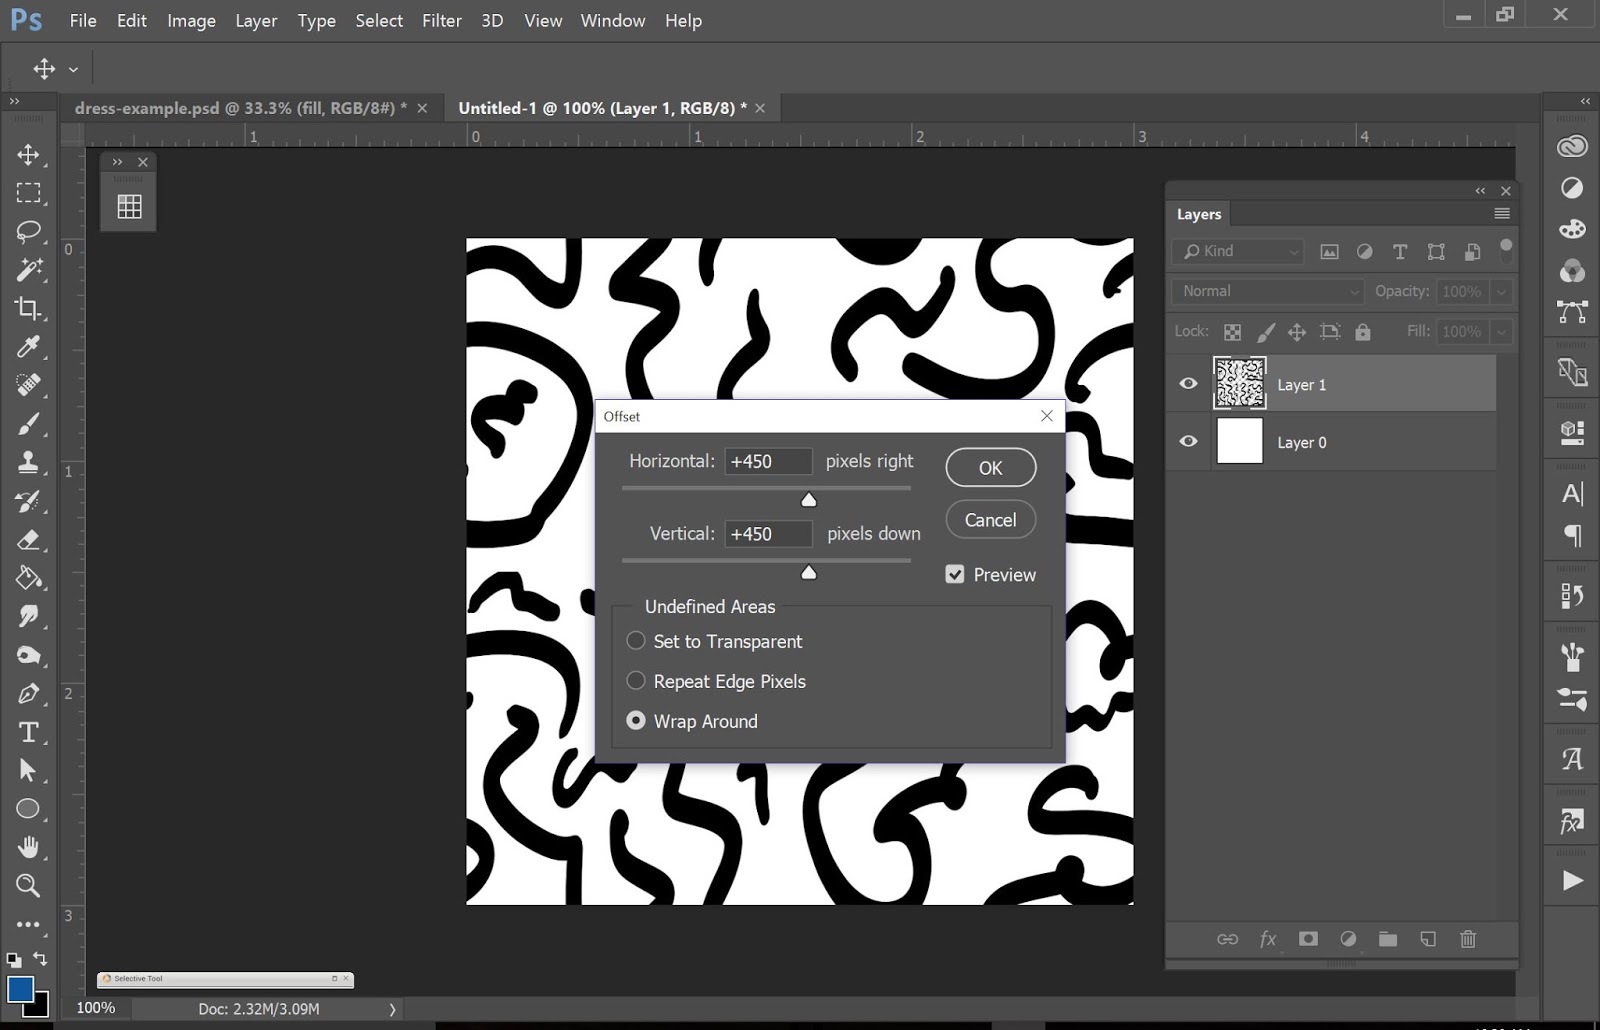
Add a layer above the background layer and draw some squiggles.  Once you're happy with that, go to Filter>Other>Offset filter.

Enter in HALF of your canvas size in the horizontal and vertical values.  I use 450 pixels because my canvas is 900 pixels.  Click on OK and go back to your image.  If you have obvious gaps (it'll look like a white cross running through the middle of your image), then draw in more squiggles in the gap.  When you're happy with that, turn OFF the white layer, select all of the squiggle layer, go to Edit>Define Pattern.  Now you have a squiggle pattern for your dress! Go back to the dress file to use it.


You can apply your pattern a few different ways. I'm going to apply mine as a clipping mask.  Photoshop doesn't allow for multiple pattern fills in the Layer Effects menu, and, ultimately, I want to add a pattern (glitter) to this squiggle pattern.  Using a clipping mask is a pretty good way to do this.

Add a new layer, using the paint bucket to fill the layer with the pattern.  Remember how I said to turn off the background layer before creating your pattern swatch? This is why.  The background of the pattern needs to be transparent.  Right-click on the pattern layer and choose Create Clipping Mask. This hides all of the unnecessary parts of your pattern and you can adjust the pattern layer with the Move tool (scale, rotate, etc) until you're happy with it.

Now here's the fun part!

I'll use the Layer Effects menu to make this all glittery.  With the clipped pattern layer selected, click on the little FX button in the Layer panel.  Select Pattern Overlay.  If you don't see all of the other layer options, just click on the FX button and select show all.

 
I'm using a glitter pattern that I made in ArtRage, but there are loads of resources available.  There are free glitter patterns here and paid patterns here. (Just as an aside: I do NOT get paid to recommend products or anything.  I'm suggesting these because I use them myself & I'm happy to share them.)

Next, add a color overlay in the same color as the dress. I select Color as the blend mode.  This give the glitter layer a slightly lighter blue than the dress.  Play around with the blend modes until you're happy with the results.

Finally, I like to add a small, hard bevel to the pattern layer.  It makes the pattern look slightly raised and I like the effect of that.

And that's pretty much it.  Sometimes I'll make the dress fill a gradient.  In the Little Rock example, I also added a highlight layer where I used a starburst brush to create the sparkly bits.  It can really get as complex as you'd like (or have the patience for!!).  I suggest keeping each part on its own layer (color fill, pattern, highlight, shadow, etc).

On Monday I'll have another Sarah set ready to go so look for that.  Any questions about this tutorial, feel free to let me know!


Monday, October 9, 2017

Josephine Out in the World

Every once and a while, I get a request for paper dolls.  Sometimes it's a custom order (which you can do on the Etsy site).  Sometimes it's a suggestion for a theme or a doll or something of that sort.  And I only do those if I'm feeling up to it.  Not every theme is for me and, well, this blog is my pet project and I do what I want with it!!

I really love requests with an education angle.  Some of the Kawaii Kids were used by a school a few years ago. And I created a custom order for a school teacher with paper dolls in business wardrobes.  I loved that one! Today, I'm sharing some images from an event which utilized Josephine.

I was contacted about using Josephine as part of a women's ministry activity.  And the pictures are great! Lola Lewis of the Lincoln Park Community Baptist Church out in Columbus, Ohio made the request & then was kind enough to share some pictures from the event.  These are just a few.


Ms. Lewis sent me just the sweetest email about the event! The ladies had a wonderful time cutting out & dressing Josephine and even introduced some of the teens there to the "lost" art of paper dolls.  A great time was had by all & I'm so happy to have had a small part in that.

As a random side-note, Josephine is ranked in the top million books on Amazon so feel free to grab a copy and bump that number up!!

So thank you again for sharing these fantastic images! And if anyone has images they'd like to share of my paper dolls past & present, I'd love to see them!

Friday, October 6, 2017

Sarah's Simple Wardrobe - Set 2 Color

Sometimes, I have little to share on the good ol' blog.  Other times, I feel like I have all the things to share! This is one of those weeks where I have lots to share & write about....so much, in fact, that I'm going to spend next week doing just that.  So instead of a Sarah set next week, I'm going to have a few other random things to post.

Today, however, Sarah's second wardrobe sheet is in color and ready to download.

Right-click to download and print

Every week, I like the color version better than the black and white version! I like Sarah but she isn't my favorite paper doll ever.  We'll see how long this lasts...maybe til December when I have the month-long project.

Speaking of December.... I have an idea in mind, finally! But I want to know this: what's the preference out there -- a black and white coloring set or a full-color set? I haven't actually started it yet, just looking for some thoughts on the matter.

Pop by next week for some random things that I've been up to! Til then, enjoy the Sarah project!

Monday, October 2, 2017

Sarah's Simple Wardrobe - Set 2 Black and White

Over the weekend, I went to Vermont.  My family has lived in northern Vermont for literally hundreds of years, but the time has come for my grandmother to leave.  She's coming to live with me & my family this month and we started packing and organizing her things.  It's a tough task and I'm very happy that we're doing it now with her input instead of later without it.  The stories alone have been fantastic.

Anyway.... today I'm posting another wardrobe sheet for Sarah.  It's also Inktober which I  always swear I'll participate in and somehow never get to it.  Maybe I'll catch up this year and jump in the game!

Right-click to download and print

Check out those ruffles!! I figured out how to draw ruffles ages ago and now I want to draw them all the time. 

On Friday, I'll post this in color!