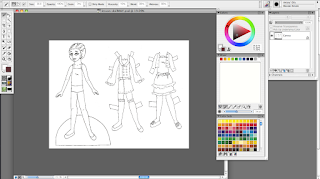
We're going to continue working with Corel Painter X today. Get out a cleaned up line drawing & get ready to "paint"!
This is the doll I'm going to work with today. Make sure that you've got a clean, black & white image to work with. Save it as a psd file and open it in Corel Painter.
Normally, I use a more universal format, such as jpg or png, but for some reason (program problems? user error?) I couldn't get a jpg to open in Painter but it opened a psd just fine. You may not have this problem, but just keep it in mind if you do.
Here's what your workspace should look like. There is a layers panel to the far right and that's where we'll start. I want to create an outlines layer and a working layer. If you've followed along with the Photoshop lessons, this will be pretty familiar. I'll be using a Wacom tablet and pen to color this. You could use a mouse, but a tablet is easier & more natural.
Painter has a few quirks that take some getting used to. First, the Canvas layer (equivalent to a Background layer in Photoshop) is permanently locked. You can't move, copy, alter, etc, the Canvas layer. There is a way to get the outlines out of the locked layer. For more on the complexities of Painter's layer types, check out this post. It's more complicated than I plan to get in this lesson.
At the top right of the layers panel there's a small black triangle. This opens up a layers menu. Go to the bottom of the menu and select Lift Canvas to Watercolor Layer.
What we have now is a blank canvas with a watercolor layer above it. The watercolor layer has the outlines. It's set to Gel and Ignore. This created a transparent layer for the outlines, which is exactly what I wanted. If you try to paint on this layer, you get a pop-up that says you can only use watercolor brushes on this layer. We aren't going to paint on this layer, so it's not really relevant.
Make sure to change the name of your layer to outlines (or something similar) in order to keep your layers organized.
And finally, here are my layers. The top layer is a transparent, watercolor layer where I placed the outlines. It is set to Gel and Ignore. (I'm not going to pretend to fully understand what that means. It does what I want it to do!) Next, I add a layer under this, name it "paint", and set it to Default. Lastly, there is the white canvas layer that is locked. All of the painting will be done on the Paint layer.
Now it's time to paint. Play around with brushes, settings, and colors.
I'm using the default artist's oil brush. I mixed my own skintone in the mixing palette and applied it to the doll. A lot of the same shortcuts from Photoshop work here, too. You can change the size of the brush with the bracket buttons. The spacebar acts as the hand tool shortcut, and Command - or + (or Control on a PC) adjusts the zoom of the canvas. If you have a scroll wheel on your mouse, you can zoom with that, too.
I like to paint one color at a time, so I painted in the skintones first. One of the advantages of using a natural media program is the ability to blend colors on the fly.
This is some of the shaded & blended skintone. Every time you pick up your brush, that is a completed brush stroke. I was able to blend the skintone by holding down my brush as needed.
You can choose to paint all on one layer and use the eraser as needed (or blend the colors) or you can set up a layer for each color. I chose to paint on one layer. It's a bit more like I would paint on canvas.
This is some of the color. I'll clean everything up later on. I've decided to keep the black outlines. If you're feeling up to it, you could create a new layer just for outlines and re-draw those. I'm fine with the black outlines for this exercise.
More of the same. In this image, I've started to clean up the edges of the doll and the edges around the first outfit are still sloppy. The second outfit is still uncolored.
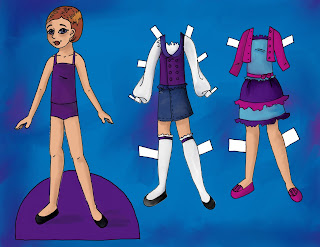
This is the final doll. I added a background color. I discovered that the brush didn't track well at large sizes. I don't know if it's the program, my computer, my Wacom, or some combination. Could even be a setting I don't know about.
Overall, I'm pretty happy with this. It's my first completed project using Corel Painter. Painter is an enormous program with enormous potential. For my purposes, it might actually be more than I need. It's amazing, and I'll continue to experiment with it, but my preferred natural media program is ArtRage for its simplicity.
I hope you enjoyed the lesson & learned something. I know I did!
Also, there are two special edition paper dolls coming in the next few weeks so check in on Friday. That's when I'm posting the first of them!


No comments:
Post a Comment
Comments post after approval