Friday, January 30, 2015

Toddler Fashion Friday - Octavia

You would think that a multi-day snowstorm would give me plenty of time to create paper dolls for this little blog.

You would be wrong!

We had a monster storm hit and my town received 32 inches of snow.  That's about the same height as my not-quite 3 year old son! Seriously, we got a "toddler" of snow.  Boston basically shut down, and in the far reaches of the outer-outer suburbs where I live, the kids have had 4 days off from school!

My kids were super excited about the snow.  So between taking them out in the snow and my husband working from home (and shoveling!), there wasn't as much time to create paper dolls as I would have liked.

Regardless, I did manage to finish up Octavia today.


Octavia was influenced by Olivia.  This is a little summery for the winter wonderland out my window! The Olivia set always felt like two wardrobes and this doll does, too.  I liked the plaid, the green, and the "leather" coat.  They don't feel like a cohesive group, but they don't contrast overwhelmingly either.  Anyway, it's a cute set and I like the ways these dolls are coming together.
 
Also, I have a new paper doll book to share on Monday.  Look for that! 

Friday, January 23, 2015

Toddler Fashion Friday - Cassidy

Another installment of the toddler paper doll this week!  I love this series.  Honestly.  It's so refreshing to create these...

I've been tinkering with the blog a tiny bit.  I updated the Paper Doll Download page some.  I have more organizing I want to do.  It's a bit of a pain: I have to create an HTML table and place all of the links & images into it.  It isn't difficult, just time consuming! And I did manage to create 100 fashion paper dolls.  An accomplishment I'm pretty proud of!

So today I have Cassidy, again based on a previous doll.  I loved the plaid & colors and it was nice to play with those again.


And Cassidy was inspired by Chloe, which you can find here.

One last thing.  I know I haven't posted a lot of tutorials this year.  Part of it is a bit of a busy schedule and part of it is a lack of ideas.  I've been playing with some new computer programs, so I may write about that.  I'm always happy to take requests, so if you want me to write about a topic just let me know! 

Enjoy the doll!

Friday, January 16, 2015

Toddler Fashion Friday - Libby

January is starting to feel like normal time again.  My family (like so many others....) gets so busy in the weeks between Thanksgiving and New Year's.  It's nice to get back to routine!

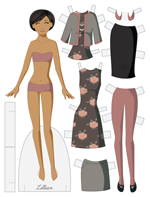
Today I have Libby, the next in my toddler series.  Just like with Bria, I went back to my archives for inspiration.  This paper doll goes back to Lillian, a paper doll in greys and grey-pinks.


One of the things I loved about Lillian was the rose pattern.  The colors were nice, too, but those were a result of the pattern.  I also like the stitching detail.


For Libby, I really wanted to focus on the colors and stitching detail.  I was also more careful about the outfit fit here, and every top fits with every bottom.  Be prepared for a lot of leggings with these toddler dolls!  I've noticed that a lot of little ladies wear leggings frequently, both under dresses and on their own with tops. They are too cute and add a lot of versatility to these little paper doll wardrobes! 

Have fun with Libby!  This was very pleasant experience to create!

Monday, January 12, 2015

Line Art using Photoshop and Illustrator

I don't spend a lot of time in Photoshop.  That's part of the reason why I created my December paper doll series in Photoshop.  It's important to keep skills current and revisiting fundamentals is a great way to do that.  I enjoyed the challenge of working in Photoshop and last week I shared my technique for making quick plaids.

This week, I want to share my method for creating quick, clean line work.  It's the technique I used on the December dolls.  It's so quick & easy it feels like cheating! There are other techniques, of course, and I've gone over several of them before.  This one is really good quick results & ideal for simple drawings.

I used both Photoshop and Illustrator to create my line work.  Most of my work is done in Illustrator, it's a program I understand, and it gives me amazingly sharp detail in a way I can't achieve with any other methods.  If you don't have access to Illustrator, I strongly recommend Rachel's line work tutorial on Paper Thin Personas.  It's a brilliant method and produces really nice results.

I start with hand-drawn sketches.  We'll use the good ol' lesson doll to demonstrate.


I like to clean up my drawing without resizing it.  Often, by the time I get to Photoshop I already have a full wardrobe drawn.  It would create a lot more work if I resized the doll before cleaning up the outfit sketches as well!

I'm using the most current version of Photoshop - the subscription-based CC edition.  All of the methods I describe should work in previous versions, but it's best to test it, save frequently, and always have a copy of your original image!  

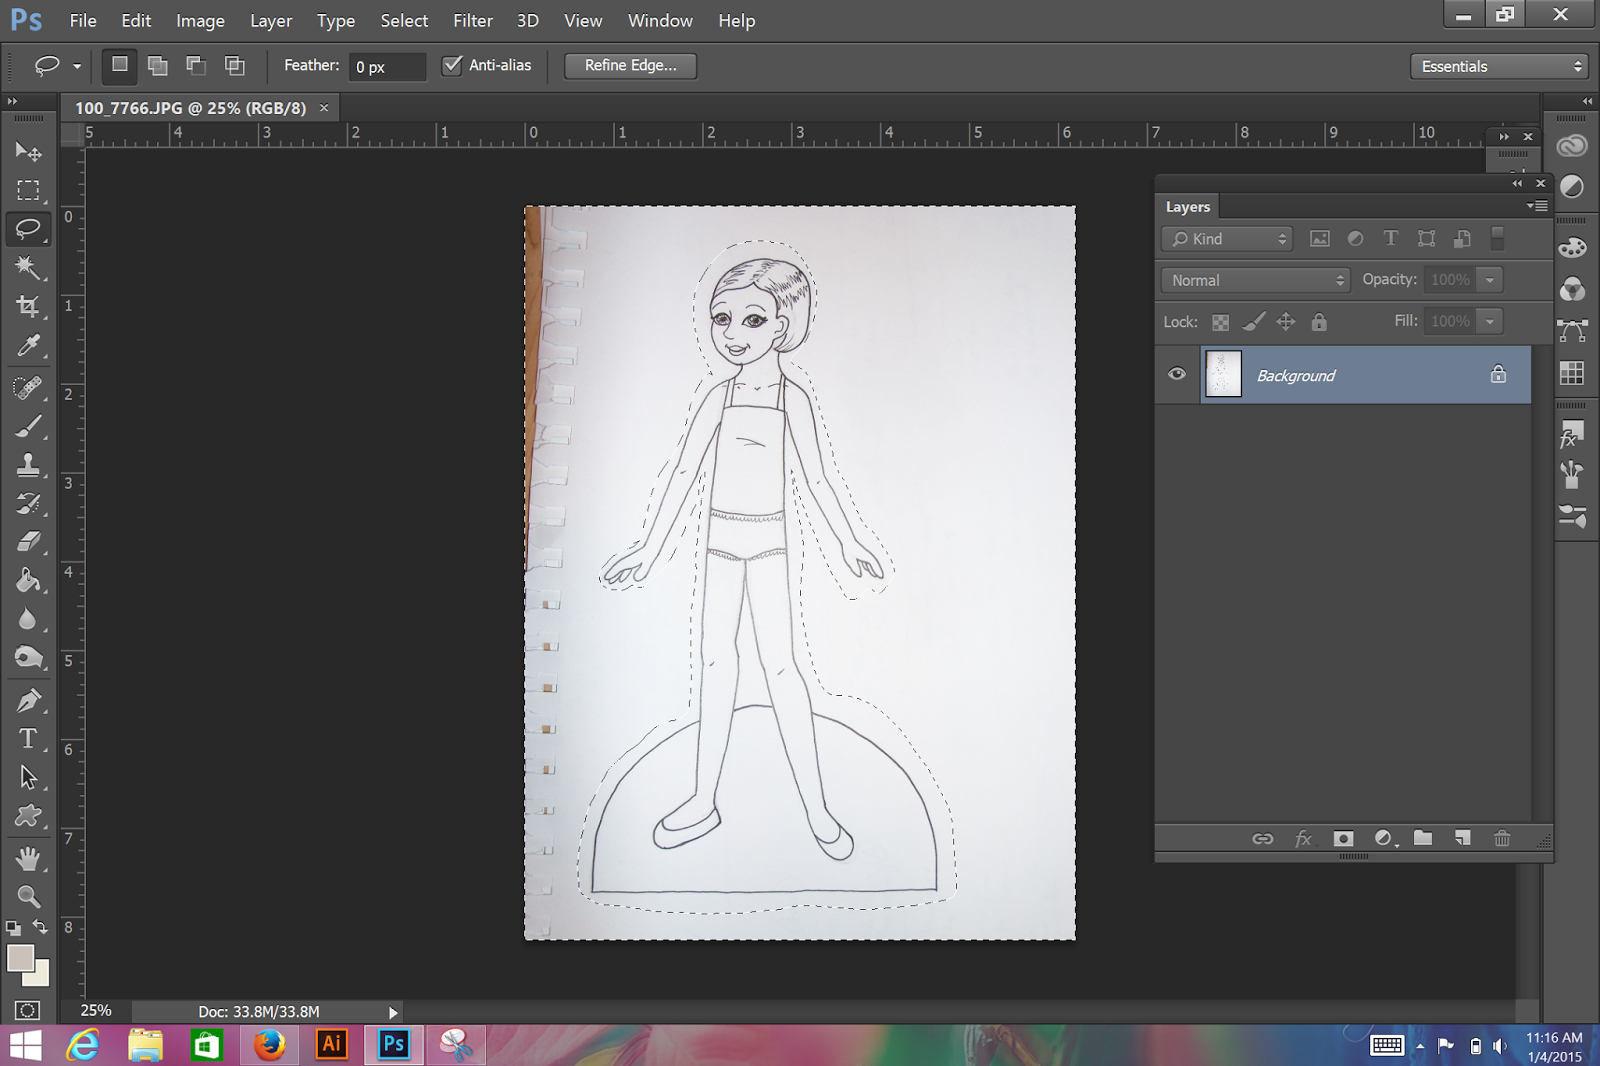
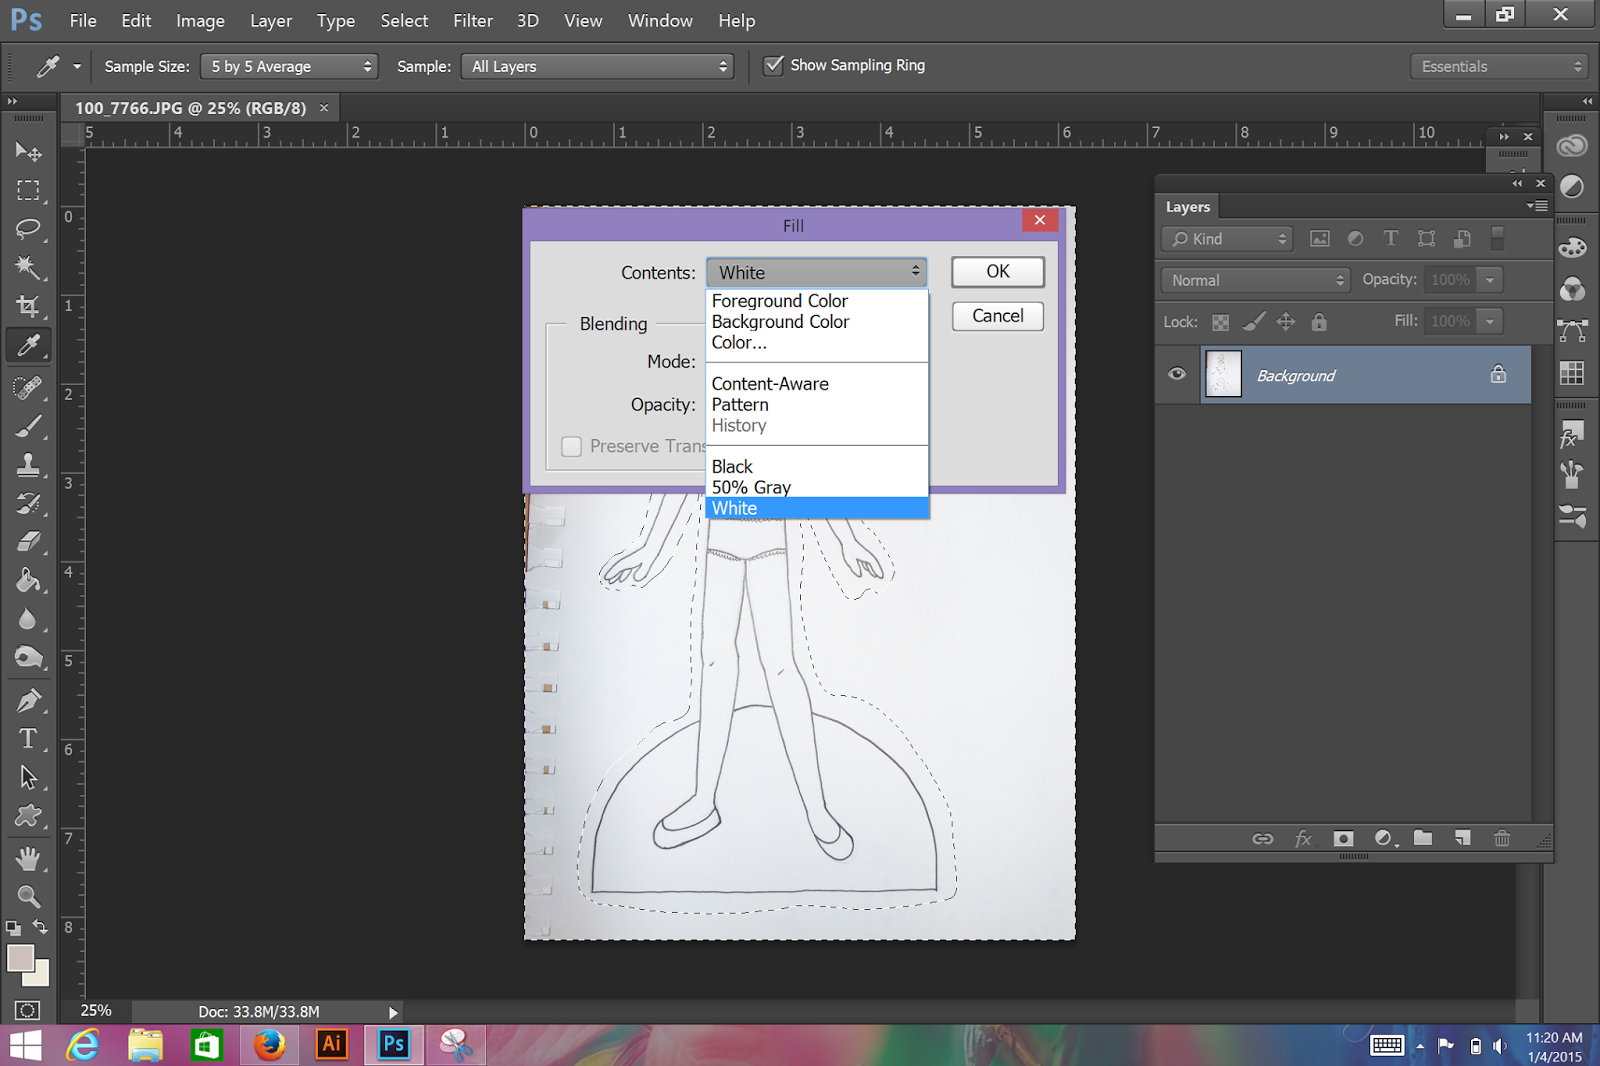
I used the lasso tool to draw around the doll.  Right-click and choose Select Inverse.  Then press the Delete (or Backspace) button and a menu will pop up.

I chose the White option.  I want to have a black & white image to port into Illustrator and selecting the white background just speeds this up a bit.


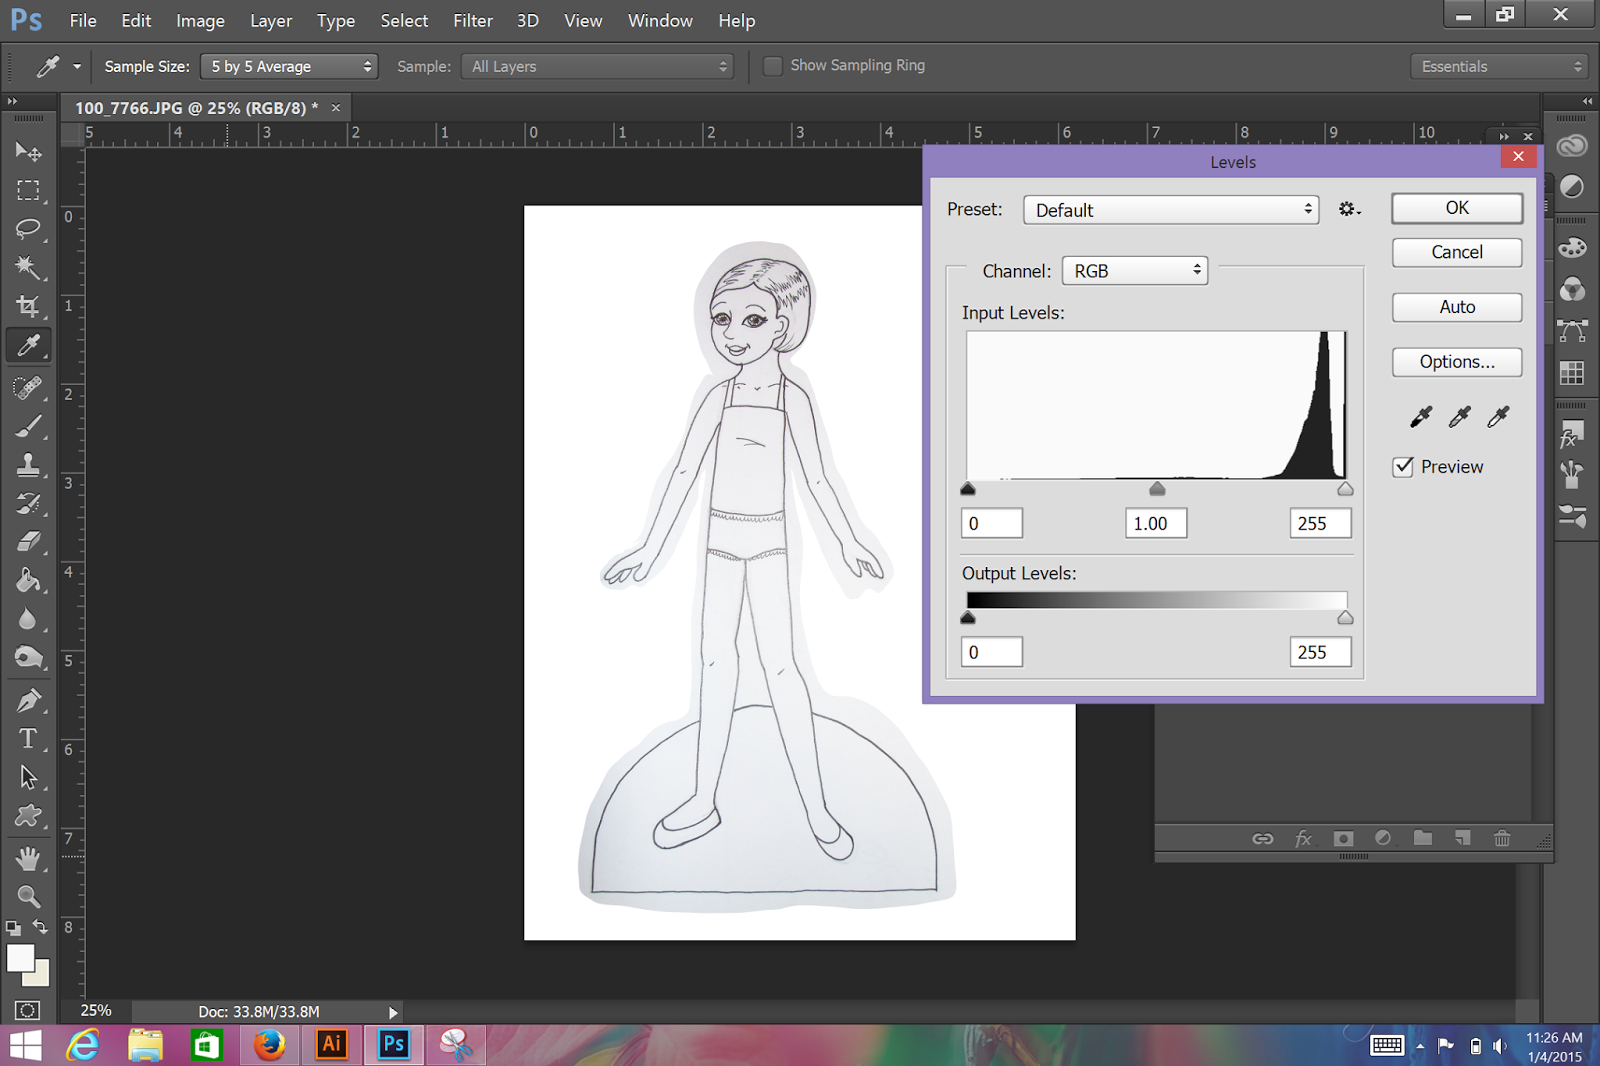
Now that I've erased most of the grey paper color, I can get the line art closer to pure black & white.  To do this, go to Image>Adjustments>Levels.  Using the white eyedropper (on the far right) select the darkest of the grey color.  In this image, it's in the lower left corner.  This takes that tone and any similar tones and makes them white.  Once my background is white, I use the Dodge tool to darken up any grey tones so that they are dark enough.  They don't need to be perfectly black, just black enough to not be white!

Next up, Illustrator! You can save your current file and open it in Illustrator, or take the lazy route like I do: select & copy your image in Photoshop, open a new file in Illustrator and paste your file there.

We're going to use the auto trace feature in Illustrator.  This technique maintains the hand-drawn qualities of a sketch while having the advantages of a vector image.  I can scale a vector infinitely but I can't scale a sketch (even a high-res scan) infinitely.

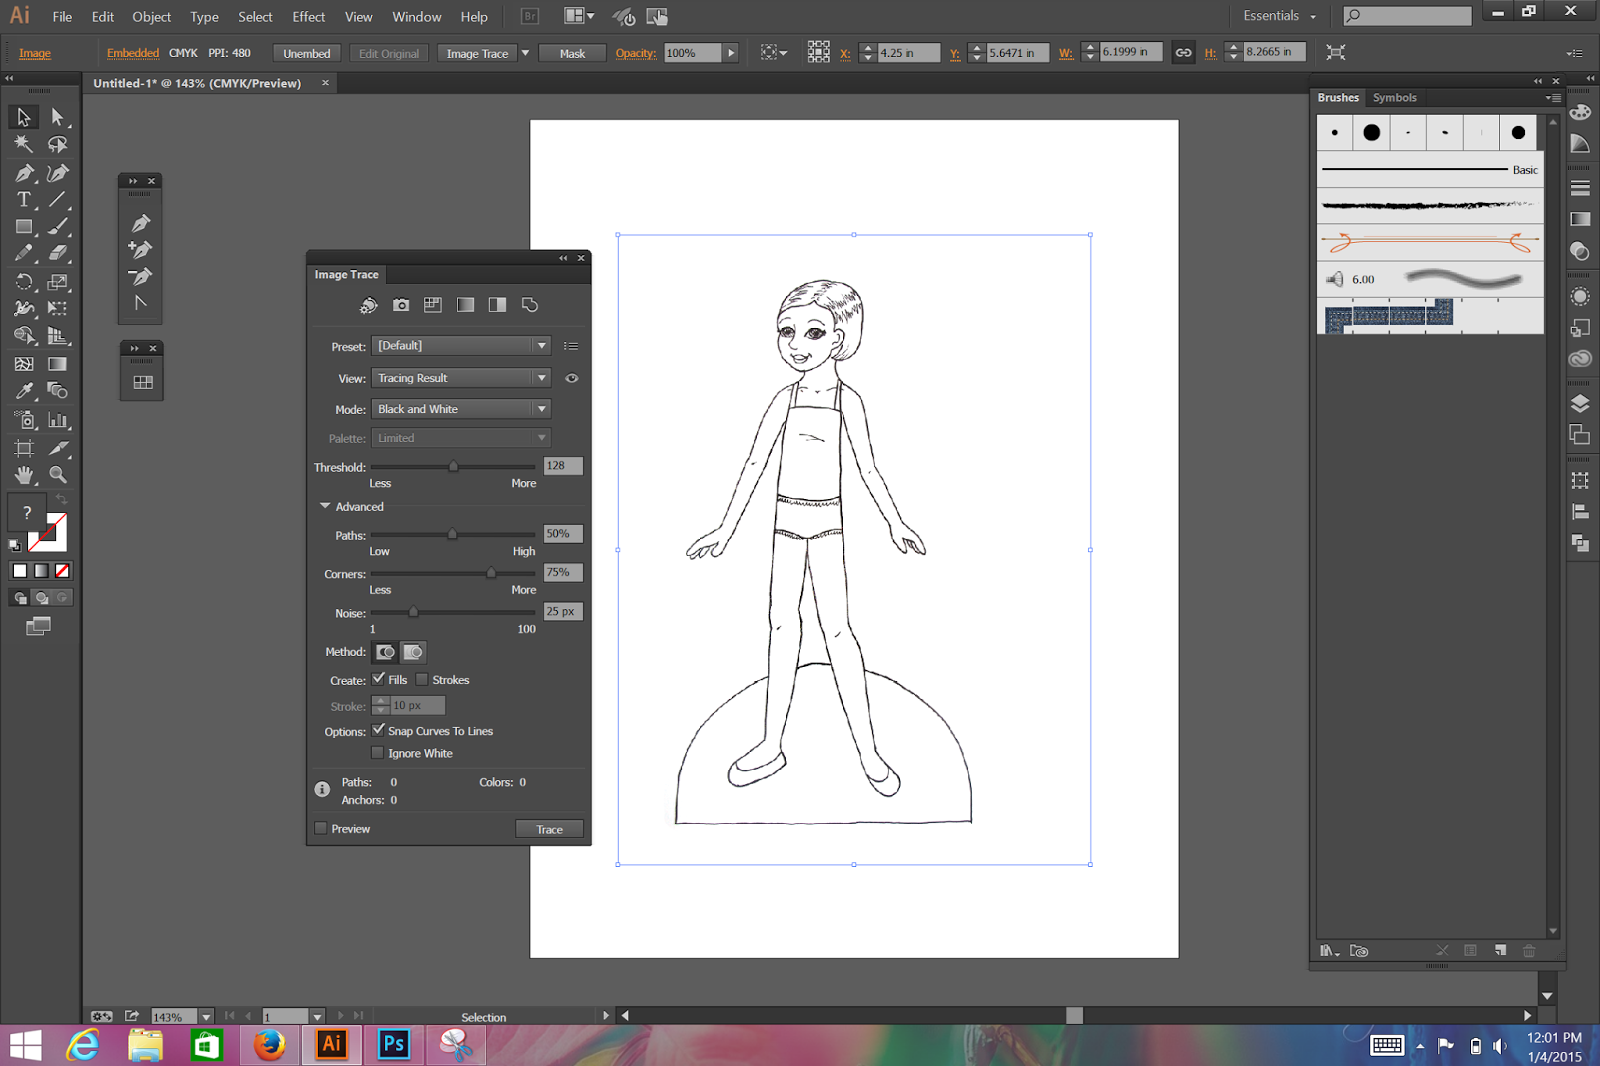
Once you've opened your image in Illustrator, go to Window>Image Trace.  This opens the auto trace menu.  A word of caution: auto tracing takes some practice and fiddling with settings.  It isn't perfect.  It will give you smooth, hand-drawn style lines that are great for painting over in Photoshop.  It will not give you the perfect, point-by-point smoothness of a carefully crafted vector.

Here's the image with the auto trace menu open.  The blue box around my paper doll indicates that the image is selected and ready to trace.  Illustrator has several built-in presets for auto tracing.  I found that the default worked beautifully in this case.  Sometimes I click on Ignore White, sometimes I choose a different preset.  It just takes a little time trial and error.  If you find a method that works really well for your type of image, you can save it as a new present.  There's a little menu button next the preset drop-down where you can do that.

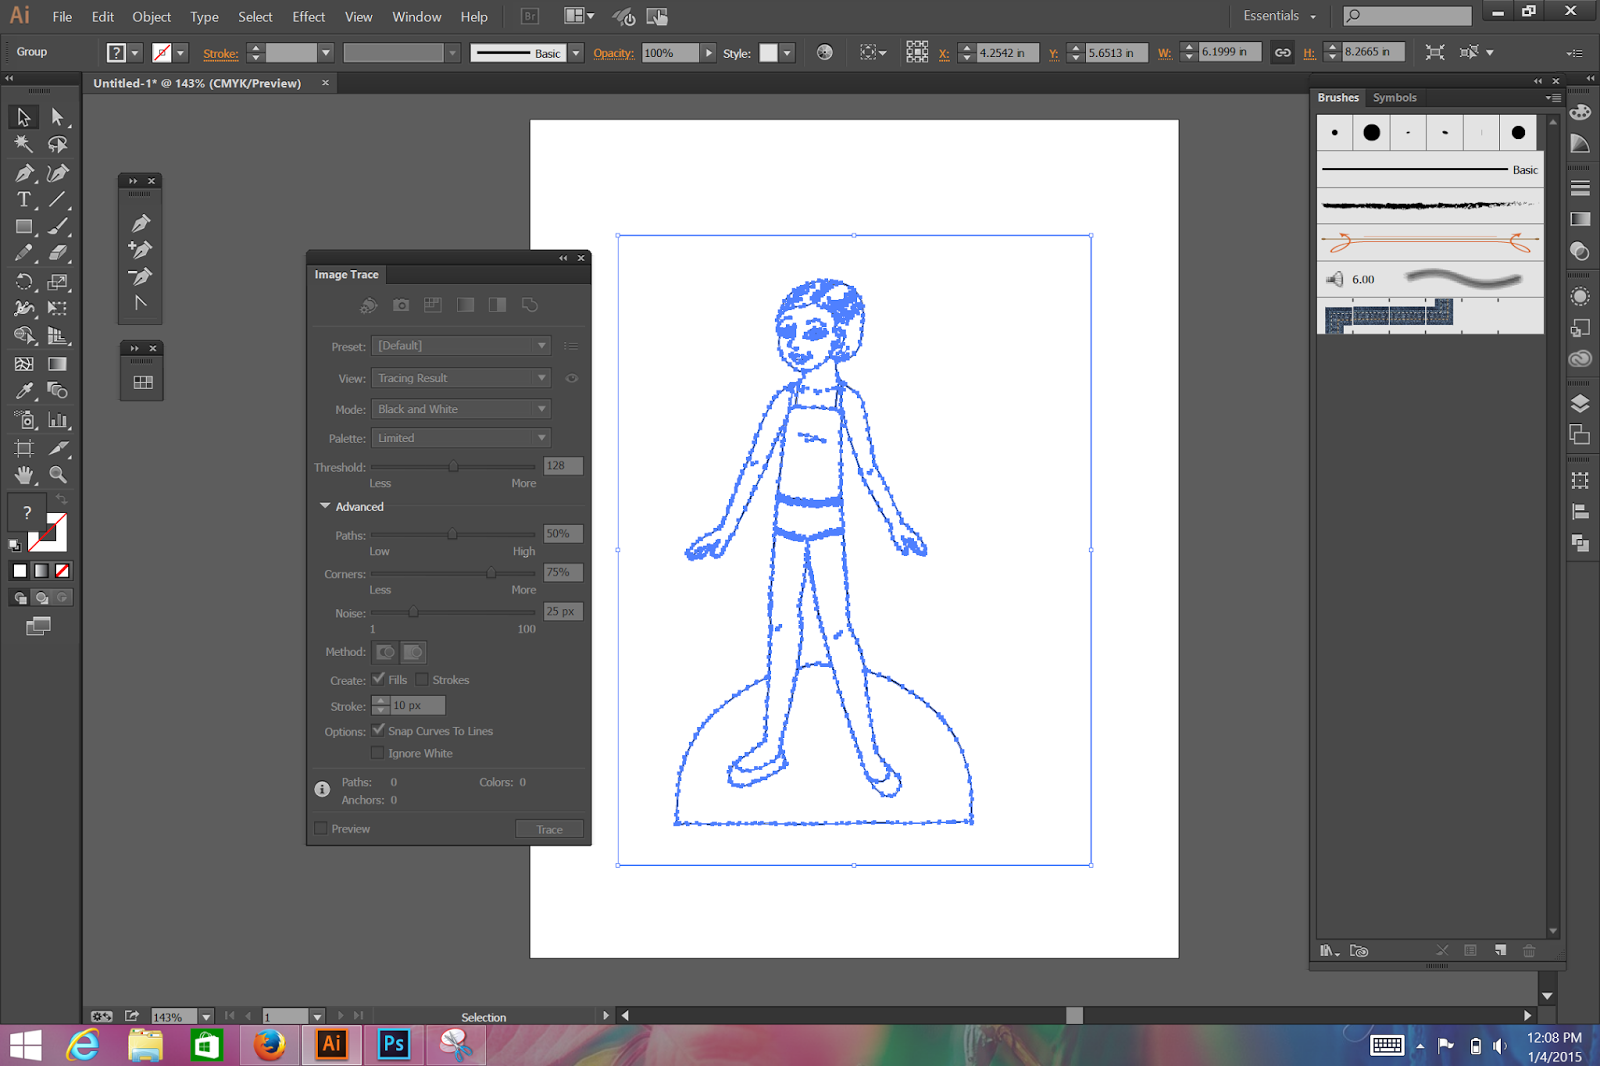
Once you're happy with your image, click on the Expand button in the menu bar.


All of these blue dots are vector points!  This is a sloppy vector (which may be exactly what you need or want) but wonderfully clean lines for Photoshop.  At this point, you can export this image and open it in Photoshop or copy and paste back to Photoshop.

I pasted mine back to Photoshop.  When I hit Paste, a menu pops up.  I like to choose the Pixels option.


Because Illustrator traced the white as well as the black, my traced image retains a white background.  Tracing the white gave me a better level of detail so it was worth the trade-off.  I usually set my lines to Multiply anyway (as I did here) so it really doesn't matter.

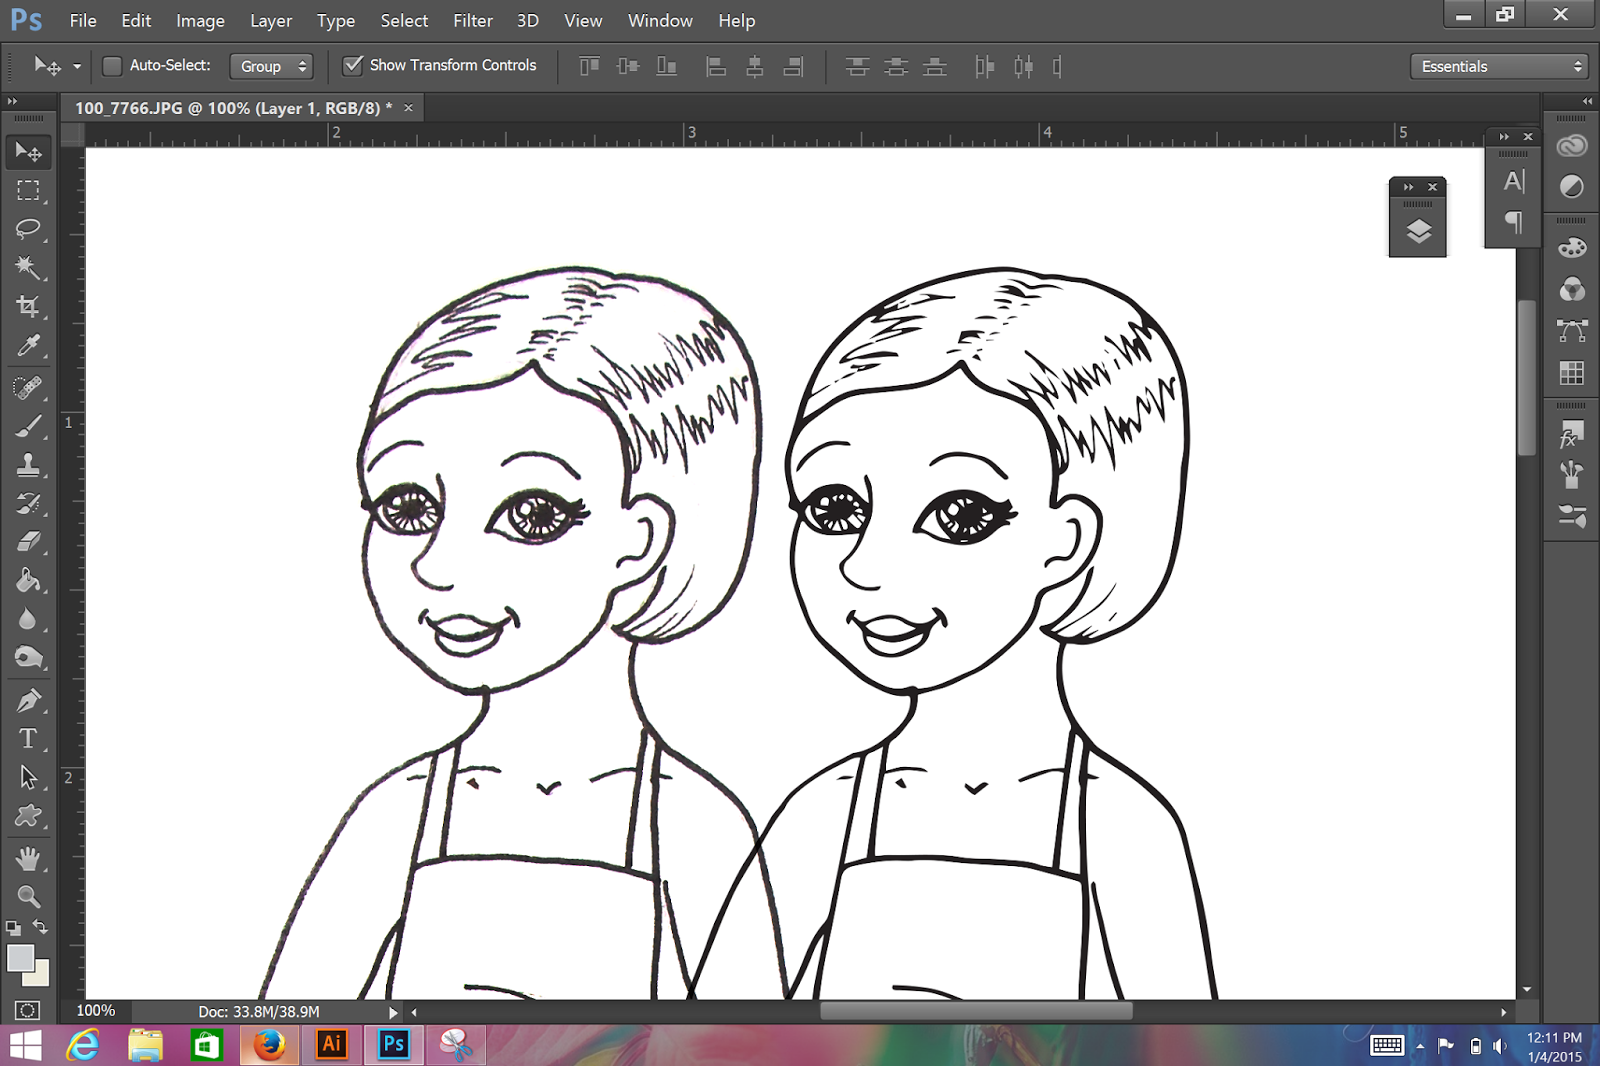
On the left is the cleaned-up version of the line art from Photoshop.  On the right, the auto traced version.  It's very smooth compared to the Photoshop version.  I might trace and paste back & forth several times before I get the results I want.  Even then, I may edit the lines in Photoshop to get them exactly the way I want them.

This technique words best for simple drawings and paper dolls or illustrations that use black (or single color) lines. In my example, the eyes and hair were really a bit too complicated for this method but I went with it anyway.

Hopefully this is a good introduction to Illustrator's robust auto trace function.  Any questions, feel free to ask!


Friday, January 9, 2015

Toddler Fashion Friday - Bria

First things first: pdf downloads are working again! Let me know if there are any problems...

Today is the first of a new paper doll series! I mentioned way back in August that I was developing a new toddler/baby paper doll to go with the fashion set.  I don't create many child paper dolls so this was a real adventure for me.  As a mother and aunt, I've developed an appreciation for children's clothing.  I like my boys to be as fashionable as two grass-stained, rough-and-tumble little kids can be and buying dresses for my nieces is an absolute joy. The children in my life are quickly outgrowing the cutesy baby phase (my oldest niece is nearly 7!!) and creating a paper doll seemed like the best way to appreciate some of the great kids' fashion I've seen over the years.

I also had this vague idea of mother/daughter or sisters (much like the Barbie/Skipper/Stacie ages) for this set.  As a way of revisiting some of my previous fashion paper dolls, I decided that each of these toddler paper dolls will reach back to previous sets.  Today's set references Bridget, the first paper doll I crafted for this site.  There are so many patterns and color combinations that I love in my previous sets and wanted to give them another go.


Here's Bridget from 2012! I was just starting to understand the way Illustrator handled patterns, as well as learning to craft my own.  The pattern here was pre-existing in Illustrator.  I loved the colors and the pattern so much!

I feel like there's a lot more flexibility in children's clothing.  I created some stripes & polka dots to go with the flower pattern.  Mixing patterns and colors have such a playful tone in kids' clothing.  I also made the toddler doll with similar hair & skin tones.


These sets take a little more time to create.  It's a new series, so I'm developing it as I go.  I'm also testing the fit more than in previous dolls.  With this set, the green top can be worn with everything except the puffy skirt.  I just couldn't get it to work without ruining one or both.  Still, there are loads of mix-and-match options, with still more coming with more sets! 

Let me know what you think.  I think she's rather cute and I can't wait to see what the kids in my life think of her!

Thursday, January 8, 2015

Technical Difficulties to start the New Year!

Just a quick post: I'm having some technical difficulties with my personal website.  If you are trying to download any of the pdfs from my site, they aren't working at the moment!  It should all be resolved today or tomorrow.  I'll keep everyone posted!

Thanks for being understanding!!

Monday, January 5, 2015

Quickie Tutorial: Creating Stripes and Plaid in Photoshop

Thank you to everyone who came to check out my December paper dolls! It's a challenge and a joy to create a 30 day paper doll set every year.

There are a few reasons why I chose the project I did this year.  First, I have several random paper dolls started.  Some are just a doll base and some are partial or complete doll & outfit outlines.  This paper doll was just a doll base and I thought it was time to flesh it out.  Secondly, I wanted to get to know my Surface computer a little bit better and the best way to learn is to work.  And finally, I needed to brush up on Photoshop.

And here's my first tutorial of the year! There's a fun trick I learned in Photoshop several years ago while working on my design certificate.  One of my teachers showed us a great technique for making a quick stripe or plaid.

That's what I'll be sharing today.

You'll need Photoshop and an image.  Doesn't really matter what the image is as long as you like the colors.

I found this landscape online using an image search.  The colors are great!  Open your image in Photoshop.

Go to the selection tool (second tool down on the toolbar on the left) and select the Single Row Marquee Selection tool.  Use it to select a single row of pixels in your image.

Create a second layer or new Photoshop file.  I like to use a new file and make it square.  Squares just seem to make better patterns...

Using the singles row selection tool, copy a single row of pixels and paste it into your new file.

This is what you'll see.  Select the Move tool (it's the first tool -- the arrow one -- at the top of the toolbar on the left).  Use the Move tool and stretch the single layer so that it covers your document.

See how easy?!  This would make a great stripe pattern.  Use the rectangular selection tool and select the entire image.  Go to Edit>Define Pattern and you've created a new stripe pattern.

To make a plaid, duplicate the striped layer.  Rotate the new layer 90 degrees. You'll have one layer that's vertical stripes and one layer that's horizontal stripes.  Change the opacity of the top layer.  I changed mine to about 80% opacity.  Doesn't really matter what it is.

Here's the plaid.  Once you're happy with your plaid, merge your layers and select the entire canvas.  Go to Edit>Define Pattern and create your pattern. 

That's it.  It takes just a few minutes to create a striped or plaid pattern that looks crazy complicated.  It all depends on your original image.  You can also take shapes or paint blobs or whatever and do the same thing. Play around with it and you'll find some interesting patterns!