Wednesday, November 25, 2020

Red Riding Hood

A few days ago I received my Paper Doll Studio magazine. It's a little bittersweet. This may be the last issue but it's also an opportunity, I think. Before Paperdoll Review, I knew very little about vintage paper dolls and I know that there are a lot of collectors who know less about contemporary paper dolls because they only subscribe to Paperdoll Review. With one magazine, everyone gets to read about all of it in one place! It's going to be the best of both worlds.


For the Make Believe issue, I decided to tackle a project I've been thinking about for a while - Red Riding Hood. I took a fairy tale class in college and the idea of evolving fairy tales fascinated me. There's a classification system that traces stories around the world. It's really neat if a little academically dense.   Anyway, Red Riding Hood has a long and rich history that I wanted to illustrate.

I started by sketching the doll. It was tough. I went through roughly 20 sketchbook pages! I just couldn't get it right. And I nearly gave up. Instead, I tried a different pose and that worked better. 


That image is composite of the best of the bad sketches! Part of the reason why it was so tough is because I don't make drawing the habit I once did. I don't make the time to draw every day - especially in the insanity of 2020 - and my skills have suffered. It'll come back. It just takes time and dedication.


I finally settled on this pose. I wanted the doll to be a 21st century girl. She has a red hoodie, a pleated skirt, and a timeless hairstyle. Once I got the sketch to this phase, I took a picture of it and worked on it in Autodesk Sketchbook Pro, my current favorite program.


In a different file, I worked on the background. I knew I wanted it to look like a traditional fairy tale book illustration. When I think of traditional fairy tale books, I think of gold leaf, illustrated drop capitols, and gorgeous lettering. 


So that's where I started. I used a guide from Ian Barnard's Grid Builder kit to place my title text. (NOT a paid post - that's the tool I bought, for my use, and you can check it out if you want.) I used Photoshop to layout the title and borders. Once I was happy, I printed it and revised my composition.

So far, I have a file for the background, a file for the doll, and a ton of sketches. I colored the doll in Sketchbook and then added tabs in Photoshop. I "painted" my background in Sketchbook, added the gold accents as well as the red marble background in Photoshop, and combined them all into one file for the final illustration. It sounds more complicated than it was. It's not unusual for an artist to create a background and a doll, then combine them. I just did it digitally.


There are quite a few things I'd like to change about this, but overall, I'm happy with it. My compositions are evolving and improving. Her face is weird - her ear especially!! I really need to get back into the habit of drawing. I hope you all have enjoyed Paper Doll Studio magazine. I know I have - it's literally been life changing for me. If you haven't switched over already, go sign up for Paperdoll Review.

And a happy Thanksgiving to everyone celebrating it! Stay safe & healthy.

Friday, October 30, 2020

Happy Halloween!

 I found time to make a Halloween paper doll! Typically, Halloween is one of my favorite holidays. This year, instead of running wild around town, we're going to see my parents. We're having a pinata, a movie, and that's about it.  Small, manageable, but fun.

 The main reason why I managed to get a Halloween paper doll together is because I used an old sketch! 


This sketch is at least five years old, maybe more. Somewhere along the way I stopped signing and dating sketches. I might be able to figure out a more precise date if I dig... Anyway, it's been languishing for a while. I always loved the doll on the left and decided to go for it. 


My favorite program right now is Autodesk Sketchbook Pro. It's free, easy to use, and I LOVE it. And it's available for pretty much every platform. I took my scribble into Sketchbook and tinkered. Once I was happy, I "inked" it, colored it, and added textures & patterns.  It took most of the week. Considering the kids are remote learning, "the week" is like three hours a day!! 


And here she is! I'm posting it in color and black & white. Feel free to download and play with it. And happy haunting on Halloween!
 

Thursday, October 22, 2020

Books! Books! Books!

It's been a looooong time between posts! Pandemics, remote learning, etc, have definitely cut into art time. I'm not posting here as much as I'd like but I AM keeping busy! I have two new books available and I wanted to share them here.

First up, Fun with Mom


I wanted to create a vintage style mom & daughter book wit modern themes. It went through A LOT of sketches and edits! 


The covers were especially tough for me. I've worked on a bunch of covers and layouts for other artists, but found my own challenging. I reached out for help & the absolutely wonderful David Wolfe cooked up a vintage inspired idea.

I'm really happy with how it all came together! You can grab a copy here.

Next up is Rose & Ivy.
 

This started as a 100 day project way back in April of 2019. I decided to pick & chose among the 20 pages I created for that project and added a few new new pieces, too. For this, the cover was designed before the doll was even colored! I had some clip art that I just loved and based the color scheme on that as well. Once I colored the dolls in pink and green, that's when I came up with Rose and Ivy. This book was almost exclusively colored in Autodesk Sketchbook Pro - it's a natural media program and it's free for just about every platform. You can download it here if you're interested.The outfits are loosely based on the Victorian era. And it's all skirts and dresses! Grab your copy here

I'm hoping to share a few more projects before the end of the year. I'm on Instagram with more regular updates!

Thursday, June 18, 2020

Eight is Great!

I know I don't write much anymore. Truthfully, caregiving for two generations and homeschooling during a pandemic has been a been overwhelming. And though I don't draw as much as I'd like, I'm still busy in the world of paper dolls.

Today is the eight year anniversary of the ol' blog and I didn't want it to go unmentioned. In a lot of ways, this blog is closely tied to my kiddos.


Without explicitly saying it at the time, I started this to help me deal with post-partum depression and being overwhelmed as a stay-at-home mom to two boys. What started out as something to keep me sane became something bigger. My digital world of paper dolls became a real world of paper dolls. I am forever grateful for that! If you can, meet real live paper doll people. They are the BEST people. After the pandemic, of course!!

I want to say that the blog isn't going anywhere. I don't write as much as I once did but that's because of all the "real world" stuff. I've had oodles of fun paper doll projects in the works and today I want to share a few of them.


Aprons Paper Doll by Judy M Johnson
Aprons Paper Doll Book by Judy M Johnson preview

First up is a vintage inspired paper doll book by Judy M Johnson.  I was lucky enough to do a bit of editing and page & cover design for this one. There are so many cool things about this book! My favorite, though, is the back cover. I was lucky enough to create the kitchen illustration on the back & I'm pretty happy with how it came out! The whole book is just retro fantastic!


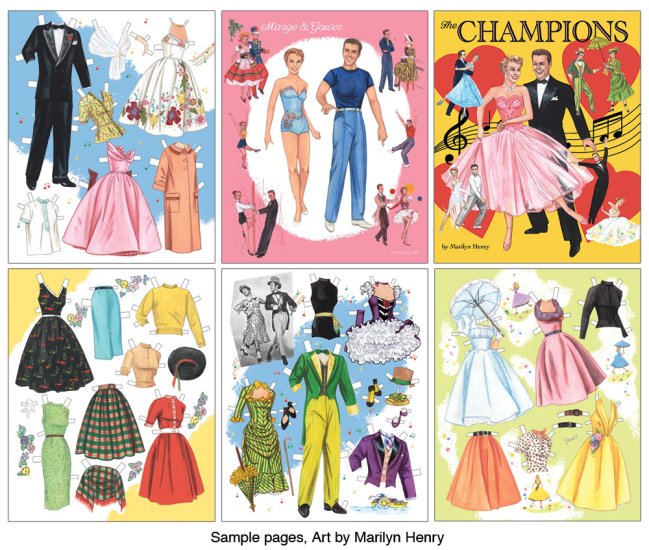
The Champions Paper Doll Book by Marilyn Henry
The Champions Paper Doll Book by Marilyn Henry preview

This was another really cool project to work on! Marilyn Henry painted these images a while ago and I was able to edit the scans as well as work on page layouts and covers. It's such lovely art and it was a real joy helping to bring in into book form.


Victorian Sports Paper Doll Book by Brenda Sneathen Mattox
Victorian Sports Paper Doll Book by Brenda Sneathen Mattox preview

Choosing a favorite paper doll artist is like choosing a favorite child - I couldn't possibly! However, if I had to, Brenda Sneathen Mattox would be at the top! I love her beautiful watercolors and this book is no exception. Every illustration is just exquisite. This one, too, I worked on some editing and page & cover design. On a technical level, I'm incredibly proud of the way the two illustrations are blended together on the front cover. Masks...love layer masks in Photoshop!!

Choosing the perfect font or illustration to compliment a book is immensely satisfying. I love collaborating with Jenny Taliadoros on this. It's been a privilege to be a part of her very talented paper doll team. All because I took the leap and went to Morgantown! Although it seems like all of 2020 is cancelled, paper dolls aren't cancelled. In fact, it's a great time to start or add to a collection! I know I am! So check in occasionally - I'll write when I can. Thanks for sticking with me so far and happy paperdolling!

Friday, April 3, 2020

Medical Wardrobe for the Fashion Paper Dolls

I'm pretty sure there are 10,000 days in 2020. My kids had their last day of school March 13th.  It feels like a century ago! The kids have been awesome - it's just been a big upheaval. That's why I completely missed posting in the month of March!

For anyone who's followed along for a while, you might remember the fashion model paper dolls. I haven't worked on them in ages. I do, however, have them listed on my Etsy and I update that occasionally.  Through Etsy, I was contacted about creating a wardrobe sheet of medical personal protective equipment (PPE).  I couldn't in good conscience charge for the custom order - the request came from a medical professional. If this sheet provides a little joy then that makes me happy.  With her permission, I'm adding it here as a free download.

This set will fit any of the fashion model dolls. I made the tabs on the masks extra long to fit a variety of paper dolls and the yellow straps on the mask are meant to be tabs. This set would work well with Yvonne but other dolls would work, too. I had a website crash earlier this year, so PDF links no longer work but printing from the preview image works just fine.

Hopefully all of you out in paper doll land are holding up well! Stay home, stay safe!!

Wednesday, February 19, 2020

Making a Renaissance Man Paper Doll

First things first - 2020 has not gone the way I had hoped.  My plan was to really swing for the fences this year! More projects, more paper dolls, more everything. That is not going to happen.

For anyone who doesn't know, my grandmother moved in with us about two and a half years ago. In that time, she's had five falls - two of which required hospitalization. The second of those major falls happened this past January.  She spent a week in Boston, three weeks in rehab, and will never make a *full* recovery.  Things are very different now than when she moved in.  I'm now her full-time caregiver in a much more hands-on capacity.  Because of this and raising two sons, the blog has become a much lower priority.  There simply isn't as much time to carefully craft the posts I would like to write. I've also found that creating bite-sized content on Instagram is easier for me so I'm trying to utilize that more. Feel free to follow me @julieamatthews. It's art and pictures of my kiddos and that's about it.

When I have time, I'll share projects and photos on the ol' blog.  That's what I'm doing today!

The next issue of the Paper Studio/OPDAG magazine (issues available here) will feature Renaissance art.  I decided to make a Renaissance Man.  He's a bit Henry the Eighth and somehow ended up looking a bit like my dad, too.

One of my goals for 2020 is to put pencil to paper more often.  I've been fully digital for a while and I'm finding my search for perfection (hello CTRL-Z!!) is holding me back a bit. I find a reference image online that I liked, printed it out, and drew from that.


In this image, the first panel is my reference image. Sometimes I sketch on top of my reference to get a feel for the pose.  The next panel is my first sketch. Hated it!  In the third panel, I traced my reference image to get a better sense of scale and pose.  I set that aside, looked at my reference again, and created another sketch.  The final panel is my last sketch laid over my reference photo.  I often do this to see if my scale, proportion, etc, is correct.

Here's the final sketch.  My scanner isn't great so I took a photo with my phone and loaded it to my computer.  Because I knew I wanted to line & color this digitally, I didn't worry a whole lot about resolution.  When I opened my working document I made sure the resolution was correct, then used the sketch to create final lines.  I always complete the lines of my paper dolls before I create outfits.

My favorite drawing program right now is Autodesk Sketchbook Pro.  It's free, available for most platforms, lightweight, and very user friendly. It's become a really important part of my workflow. Here, I have the lines on the face drawn in with a rough pencil brush. 

Once the doll was finalized, I sketched the outfits directly in Sketchbook, then lined them there as well. I also decided to color the images in Sketchbook.  For each section of colors, I filled in the flat color, duplicated the layer, then added shadows & highlights to the copy.  Sketchbook allows for some really nice blending and that's why I chose to color this way.


I like coloring in Sketchbook. It has a really natural, soft feel to it. The first panel here is a close-up of his face.  The second panel is the final doll, then a cape, and finally, a very regal outfit and hat. Again, I took quick pics with my phone of my screen so the quality isn't great! At this point, I'll open this in Photoshop to add textures and finalize the layout.


Remember those separate color and shadow layers? In Photoshop, I'll use them to create little texture sandwiches! First, I track down textures that I think will work.  I have a digital hoarding problem!! After searching through my hard drive, I found these textures and decided they'd be perfect. (Note: I'm sharing the link to those patterns because I love them - no compensation/advertising/etc.  It's really just because I love them.)

I chose a texture and placed it above the color layer and below the shadow layer.  Right-click on the texture and create a clipping mask.  That basically hides everything that isn't directly on top of the layer below.  Then, I set the shadow layer blend mode to Multiply.  Generally, I just tinker with the blend modes until I get the look I want.  For a more in-depth explanation of blend modes, check this article out.

And that's about it! I chose a background, colored it, then added a Renaissance style border and title, and shipped it off to the magazine.  Look for it in the magazine! I'll share it online at some point, too.

Feel free to follow me on Instagram & I'll post here when I can!