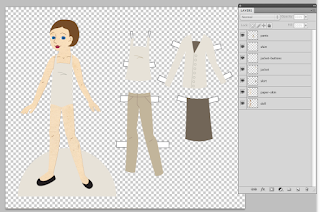
I've been doing a bit of digital scrapbooking lately. I'm making my mom a photo book of my sons for Mother's Day (good thing she doesn't read this blog!!) and I love the paper textures. So I thought it would be fun to make a doll that looks like a paper cut-out.
I found that the easiest way to do this is to start with a vector doll. In Illustrator, you can export your vector image in a number of formats, including a layered PSD file for Photoshop. For the purposes of selecting, I found this to be the easiest method. I'm using Illustrator and Photoshop, but this method should work for other vector/bitmap program combinations, too.
To begin, open a doll in Illustrator. If you don't have a doll ready in Illustrator, see Lessons 19-21 for a walk-through of how to do that.
I opened this doll and removed any unnecessary lines, like the outline of the body and clothing. This will help me keep the illusion of cut paper in Photoshop.
Illustrator and Photoshop handle layers a little bit differently. In Photoshop, you can have multiple items on a layer. In Illustrator, each shape or line you create becomes its own layer. This will be more evident when we open the file in Photoshop. For now, take each item in Illustrator and give it its own layer.
In this image you can see that the doll and each clothing piece is on its own layer. There are sub-layers within each of these layers in Illustrator, but we won't really need those in Photoshop.
That's really all you need Illustrator for at this point. Export your doll as a PSD file. To do this, go to File>Export and select the Photoshop (PSD) option.
From here, a menu pops up with some options. Select High (300 ppi) and make sure that Write Layers is selected. I use a high ppi (or dpi, basically the same thing...) so that if I wanted to print the doll it will be the best quality possible. Selecting Write Layers will make this file easily editable.
The file export can take a little while, so be patient. Once it's ready, open it in Photoshop.
Exports from Illustrator are a bit confusing. Items show up in layers and groups that don't always make sense. Take a minute and look at the layers as they exported. Here's an image of mine:
Each item is on its own layer, as it was in Illustrator. For instance, the Doll layer from Illustrator is still the Doll layer in Photoshop. Some items are grouped, such as the buttons on the jacket. They show up in a layer called Blend. Try to make sense of your layers and separate them as needed so that they make sense for you.
You could do all of the lesson just in Photoshop if you wanted to, but I like using very precise shapes for this, and that's why I go through the trouble of exporting a file from Illustrator.
Now that the file is organized, find some fun paper and texture images online. One great site is Lost and Taken. Very nice images, very well organized. As always, check the image rights & make sure that you can use these for personal use, commercial use, etc, depending on your needs. Also experiment with creating your own textures. Scan construction or scrapbooking paper, or take pictures of your favorite jeans. Anything can work as a texture!
The first step in adding a paper texture is opening the paper in Photoshop. Open your files, select a portion or all of it, and copy & paste it into your PSD file, like the image above.
Go to the layer where you want to add the paper texture. I'll change the skin tone on the doll in this example. Use the magic ward tool to select the skin tone. With this selected, go to the paper layer. Right-click and choose Select Inverse, then use your delete button to erase everything OUTSIDE the skin tone selection. Move the paper layer above the doll layer & you'll have a new skin tone.
Layers can become complicated and confusing. Make sure each layer is named, and use the folder to group layers as needed. I used several paper textures, but you can also use the Pattern Fill option on the paint bucket tool as well.
This image is the doll and outfits with textures added. I added folders to group the layers together. I have the doll folder open so that you can see all of the layers inside. Once you select a paper or texture, you can also change its color in the Image>Adjustments>Hue and Saturation menu. I did that with the brownish pants texture. I took the jean texture and changed the color.
I decided a background would be nice, too, so I found one and added it. I also added drop shadows to some of the layers to add to the illusion of cut paper inside of a digital image.
As a final touch, I took a watercolor texture and placed it in the file, as the top layer. Set the layer to Multiply and adjust the opacity. This gives the image a unifying texture.
Here's the final doll. Feel free to download the image! My method isn't the only way to get achieve this style, but it's what works for me. I like the precision of using Illustrator and the flexibility of Photoshop for textures.
Any questions about the lesson, let me know. Another doll on Friday!


This seems pretty do-able :)
ReplyDeleteIt is! And the results can be so varied... I may do a larger project like this at some point. It was a lot of fun.
Delete