This doll is late. That in itself is a miracle because I was going to skip today altogether. I've had The Death Cold of the Apocalypse. Or pneumonia. I'm not sure. My day started at 8am today -- a highly unusual occurrence. And I immediately jumped into panic mode because I bring my oldest son to school at 8:20. Lucky for me, my husband is home today (which I forgot while in panic mode) and he had everything well under control.
So long story short, I'm feeling slightly better and was able to put this doll together.
Today I have an artist paper doll, mainly because most of the parts were already created. I have an artist paper doll on the back of my business card and I was able to borrow part of that for this set. Just one of the wonderful things about working in vector -- infinite lossless scale! I also used the pattern from the simple flower tutorial and that saved some time, too.
My artist paper doll is named for Georgia O'Keefe but in no way at all resembles her. That would be a fun project: women artist paper dolls. I'll put it on my ever expanding list of projects. One day, I'll take the time to create a backlog of posts. Maybe.
Anyway, enjoy the artist paper doll!
Pages
▼
Friday, January 29, 2016
Friday, January 22, 2016
Fashion Friday - Yvonne
We're still recovering in my house. The way things generally go, my oldest son (who is in school) gets sick first, then my youngest, then me. My husband usually avoids most of it. So this week, I'm the one who's miserable!
I'm sick. The kids have been sick. Naturally, I needed to make a doctor paper doll!
Funny thing, I had a dream about that university sweatshirt. I have vivid dreams anyway but it's even worse when I'm sick (or pregnant... The zombie dreams during my pregnancies have become the stuff of family legend!)
My doctor has a white coat, khakis, and a skirt for work with a sweatshirt, tank, shorts, and sneakers for running. There's a nurse from 2013 is you want to add to your medical paper dolls! I named my doctor Yvonne after the first female doctor in Haiti. It was nice to find a female doctor who had a name I haven't used yet.
I'm hoping to recover by Monday. And there's a snowstorm coming this weekend. Sounds like a good reason to stay in and write a paper doll tutorial!
Monday, January 18, 2016
Creating a Simple Flower in Illustrator
Today is a day off from school and we really need it! My oldest is almost over his pneumonia and I'm hoping this last day at home will get him well enough to go back to school. It's been a tough week for everyone!
For today's tutorial, I'm going to go over the method I used to create the flowers in the Scandinavian inspired Santa paper dolls. I've been using this method since Illustrator CS4 and currently use it in Illustrator CC. Basically, it should work in most versions of Illustrator.
Most of this takes place in the stroke palette so make sure you have that handy.
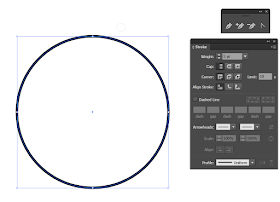
Start by creating a circle (hold Shift while dragging out an ellipse to make a perfect circle). I gave mine a 5pt stroke and no fill.
Next, go to the stroke panel. Check the Dashed Line option. To create wide petals, I used a 35pt stroke with a 60pt dash and a 30pt gap. The stroke determines the width of the segment. The dash determines the length of each segment. And the gap determines the space between each segment. The closer the stroke width and gap numbers are (in this case, 35pt stroke and 30pt gap), the smaller the distance between each segment.
I like to keep a working copy and a final copy. In this case, duplicate the circle and we'll work with the duplicate.
With the circle selected, choose a fill color. I want the fill to be the same. We're going to combine the fill and stroke to create a single shape. Continue to keep the circle selected and go to Object>Expand, then go back up to the Object menu and select Expand Appearance. You get a pop up menu -- make sure you have fill and stroke selected.
You now have the fill as a circle shape and the stroke as an expanded shape instead of a stroke. With both selected, use the Pathfinder tool to merge the shapes.
Once you're happy with your shape, you can layer and combine it to create a variety of simple flowers. Different stroke, dash, and gap options will create a variety of different petal types. Here, I layer the petal shape and scaled it, then added a circle for the center, and made sure that everything was aligned. This can be made into a brush, pattern, or just used as a shape.
Up next, I'll have another paper doll on Friday!
Friday, January 15, 2016
Fashion Friday - Quinn
Nothing kills a drawing streak quite like a sick kiddo. We've had a bout of pneumonia that was unexpected & no fun at all. My oldest has been home from school all week. He's getting better every day, though, and is eager to get back to school on Tuesday.
Today's paper doll was a bit of a quickie. I used a stock Illustrator pattern and tweaked some pre-exisisting wardrobe pieces. The jacket was totally new and I like how that came out.
It's a little goth, now that I really look at it! If I were giving this a title, I think I'd call it Goth & Bubble Gum. Clearly, I'm a bit out of my mind this week!
I'm shooting for another Illustrator tutorial on Monday, but a lot of that depends on the illness in my house.... We'll see.
Monday, January 11, 2016
Illustrator Tutorial: How to Create Lace Panel Brushes
It's been a while since I've written a tutorial. Since creating the Santa paper dolls, I realized that I had some tings I wanted to share again. So here's a tutorial I used to create a lace panel pattern brush. I've used this method on several projects, including this one and the cowgirl Mrs Claus.
Start by opening Illustrator. This should work in just about any version and would probably work in most vector programs. Create a new file, any size.
The first thing I want to do is create the panel. I'm going to keep it simple.
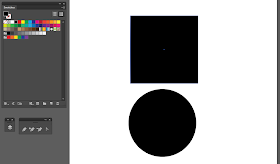
Using the shape tool, create a square and circle. Mine are each 200px by 200px. With the shape tool selected, click once to get a pop up menu. From here, you can define the size of the shapes.
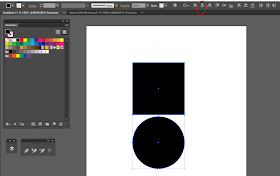
Next, select the two shapes and align them through the center. I circled the center align icon in red. Once the shapes are aligned, I move the circle up until the bottom line of the square aligns through the circle horizontally. This is why I wanted the shapes the same width.
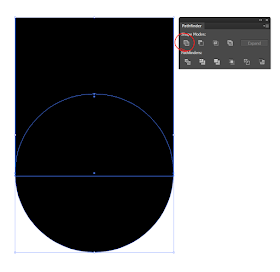
Select the two shapes and use the Pathfinder to combine them. I circled the unite option in the Pathfinder palette.
Once the new shape is finished, go to Object, Path, Offset Path. Choose a negative number -- this creates a new path inside the shape. This is where we'll start creating the "lace".
Make sure you have stroke selected and not fill. Choose any color for the stroke and really, any width. I'm going to make some dots here but any shape, single color brush, etc, would work here.
I wanted a series of perfect dots for this pattern. To create this on the stroke, select rounded caps & corners, 0 dash, and any number for the gap that is equal to or greater than the stroke width. In this case, I have a 14 pt stroke and 28 pt gap. Once this is finished, to to the Object menu, select expand appearance with the stroke is selected, and then (while still selected) go to the Object menu and click expand. There's a pop up menu -- make sure both stroke and fill are selected.
There are now a series of perfect circles, all lined up. To create a lace look, we want to knock-out the purple section from the black section. To do this, select both the black object and your series of circles, then go to the Pathfinder menu.
Using Pathfinder, select the divide icon (circled in red). This will cut out the purple circles from the black background.
At this point, I can create the brush. This shape can be as simple or complex as you want. I have an example at the end that's more complex than this.
Delete all of the purple circles and you should have an all black shape with circles cut out.
With the shape selected, open your Brushes menu, click on the new icon (it's the small square in the bottom right), and select Pattern Brush.
Illustrator has created a pattern brush from the shape. At this point, all you really need to change is the Colorization. I like Hue Shift. This enables the brush to become the color of the stroke.
And that's it. Now you have a shiny new custom brush!
The top brush is the one we just created. The second is a pattern I created. And the third is the same pattern as the second, but applied to a circle. Brushes can be applied to any path and the size can be adjusted using the stroke menu.
If you're really feeling it, you can also export the shape and use it in Photoshop as either a custom shape or create a custom brush there.
Anyway, that's how I do it. It's a lot of steps but not really too complicated. I'll have a new paper doll up on Friday!
Friday, January 8, 2016
Fashion Friday - Jenna
The first fashion doll for this year is Jenna. I used a floral motif that I developed for the Santa paper dolls in this set. This year, I'm trying to move towards more original outfits and fewer template based outfits. One of my goals with the Santa dolls was to create all of the assets instead of finding them out in the world. It was really satisfying & I want to keep that up.
I'm not entirely sure the glasses work. Also, this kinda looks like a hip Velma to me. Maybe it's just because my kids have been watching Scooby Doo lately. They're a little retro like that....
There will be an Illustrator tutorial on Monday and I'm working on some sketches for a tween paper doll. Let me know what you think!
Monday, January 4, 2016
Chanel Paper Doll
First of all, happy New Year! I was not ambitious enough to post anything on Friday. The December paper doll was plenty ambitious and I needed a short break. Do you love the new background? I do! It was time for a change!
Speaking of..... thank you to everyone who came & saw the Santa paper dolls. This December was the most popular month for my little blog ever! Thanks :)
As far as the new year goes, I'm not much for making resolutions. I did buy myself a sketchbook and I endeavor to draw every day. There was a time when that just happened and I didn't think about it. I'd like to get back to that and I'll post from that when it's relevant. Also, I'd like to post here more, preferably on Mondays and Fridays. There are also some nebulous thoughts about trying Etsy again as instant downloads.
Today I want to share a paper doll I made for the Paper Doll Studio magazine. The current issue (go order it here) features paper dolls inspired by Coco Chanel.
I wanted to create a set with a coherent feel. Color was the unifying element this time around. My model ended up a bit curvier than I had anticipated but overall, I'm happy.
Speaking of..... thank you to everyone who came & saw the Santa paper dolls. This December was the most popular month for my little blog ever! Thanks :)
As far as the new year goes, I'm not much for making resolutions. I did buy myself a sketchbook and I endeavor to draw every day. There was a time when that just happened and I didn't think about it. I'd like to get back to that and I'll post from that when it's relevant. Also, I'd like to post here more, preferably on Mondays and Fridays. There are also some nebulous thoughts about trying Etsy again as instant downloads.
Today I want to share a paper doll I made for the Paper Doll Studio magazine. The current issue (go order it here) features paper dolls inspired by Coco Chanel.
You can right-click and save these if you want to print them out.
I wanted to create a set with a coherent feel. Color was the unifying element this time around. My model ended up a bit curvier than I had anticipated but overall, I'm happy.
This set started with pencil & paper. Most of my dolls do and I strongly encourage drawing every day! I'm trying so hard to do that myself. Once the sketch was finished, I scanned it and inked it in Photoshop. I printed out the finalized doll in blue and drew the outfits over it. Then I went back to my scanner and finished everything up in Photoshop.
I'll be honest, I barely even remember making this set. I made this months ago and I've been really absorbed with the December doll. It's not a perfect set -- there are some things I would change -- but it came out nicely anyway.
I'll have a new fashion doll on Friday!


