Showing posts with label paperdoll review. Show all posts

Friday, July 25, 2025

The Technology of Tabs

I hope everyone is having a happy summer! Clearly I've been a bit busy and neglecting the ol' blog. My oldest son is working this summer but he's too young to drive so this mom is making the commute with him. It's like 15 minutes. Not a big deal but it does mean I plan my day around it. He's happy, I'm happy. It's all good! 

Today I want to share a little bit about making tabs for paper dolls digitally. I recently wrote an article for Paperdoll Review on the subject of tabs. If you're a subscriber, you should already have it. If you are not, you can grab single copies (or subscribe!) online at Paperdoll Review. I'm not going to repeat what's in the article but rather dive in a bit about the technology of tabs.

I add my tabs using Photoshop. This will also work with Photoshop Elements and should work with just about any version of Photoshop. In a 300 dpi document, I make my tabs using the vector rectangle tool with a fill of white and a black 2pt stroke (highlighted in yellow in the image below). If I'm working in a 600 dpi document, I usually use a 4pt stroke.

Most of my tabs are created this way. Sometimes, though, I need a different shape and that's the triangle tab. You can do this a few different ways.

Method 1: Create a rectangle tab with the vector rectangle tool and then click on it with the Direct Select tool (white arrow). This will highlight the four vector nodes. You can then click on one and move it around. You may see a pop up asking you if you want to change a live shape into a regular path - yes, you do! In the image below, I modified one edge with the Direct Select tool.

Method 2: You can use the Pen Tool. Take the Pen Tool (it looks like a pen!) and click nodes onto the canvas where ever you would like to create the tab. Each node can be modified with the Direct Select tool. I don't really like this method. There's less control and it can be a bit sloppy.

Method 3: CUSTOM SHAPE TOOL!! This is clearly my favorite way. Right click on the vector rectangle tool and it will reveal several other vector shape options. The last one is the custom shape tool. You can use this to drag out a shape. 


But how do you make a custom shape? Honestly, I don't remember! I know I made the triangle tab in Illustrator and brought it into Photoshop years ago. (If anyone wants a tutorial on that, I'm sure I could cook one up.) Lucky for you, you can just grab mine

I've made a public folder with my tabs and base shapes on my Google drive. They are available as an Illustrator file (.ai), a Photoshop shapes file (.csh), an EPS file, SVG file, and a PNG image. For Photoshop, download the .csh file, double-click on it, and it should be added to your custom shape menu. Any questions, just pop them into the comments.

But what about Procreate or other art software? I don't recommend adding tabs in Procreate. If folks are interested in a Procreate tutorial, I can write one up. If you have other software options, use those! Procreate isn't really good at this task. Affinity would probably work but I haven't tried it. Essentially, any software that has a vector shape option is going to be your best bet. Krita has it, but I haven't really learned how to use it well yet. GIMP and other Photoshop clones might work, too.   

Hopefully this dive into Photoshop is helpful! If you have software suggestions, let me know and I'll check them out. In the meantime, grab the Summer Fun doll from my article! 


Friday, June 20, 2025

Emma McKay Everday Paperdoll Book

Just a quick update this week! The teens just finished school so we're having a low-key transition to summer. My youngest had his braces removed (YAY!!!) so he's eating all the candy he can find. My oldest started a summer job and that's been great. And I'm transitioning to Summer Mom, sleeping in and planning fun times :)


 If you're looking for something fun to do this summer, either for yourself or kiddos, check out Emma McKay! If this looks familiar, it's because this was my 2025 calendar but now it's in book form

I loved this project so much that I really wanted to see it in book form, too. Paperdoll Review books are just always terrific! The calendar is great, of course, but having it in a book is just so much more convenient! Grab a copy today and if you cut it our, I'd love to see it!
 

Friday, May 30, 2025

Extracting Lineart with Krita

I've been lucky enough to collaborate with artists and art estates over the last few years. One thing I've done quite a bit is digitally coloring lineart. The first of these was Stripes! by David Wolfe which I colored in Sketchbook Pro on my Surface Pro 3.

I've colored several books with Brenda Sneathen Mattox, including one of her lovely brides, which was colored in Procreate on my iPad.

You can see these and more collaborations (as well as my paper dolls) at Paperdoll Review.

One of the challenges with coloring projects is how to work with the lineart. The obvious answer is to set lineart to Multiply on one layer, and color underneath it. And that's often ok. But other times, I need to have more flexibility. Sometimes I go through the somewhat tedious process of masking away the white of the page but I leave the white within the lineart. It takes time but it's worth it when I need to color, tab, and layout. I like to have my line art for each individual outfit organized into groups in Photoshop: lineart on one layer with colors in layers under that (often in a sub-group) and then tabs, also contained in a group.

It sounds WAY more complicated than it actually is! 

I've been looking for a better way to extract lineart and I think I stumbled upon a great shortcut in an app ("program" for the elder millennials and older, like me!!) called Krita

Krita is an open-source art app available for Mac, Windows, and Linux. Yes, even Linux! What that means is it's FREE! I'll admit, I don't know much about it because I'm just starting tinkering with it, but what I've seen so far is pretty great. In less than a minute (LITERALLY), I can extract line art onto a transparent layer.

I'm using the Tamara the Ballerina freebie from Paperdoll Review to test this out. If you also end up coloring this, send it over to Jenny at Paperdoll Review (info@paperdollreview.com). She'd love to see it! 

Anyway, I grabbed the PDF from Paperdoll Review. I was able to open the PDF directly in Krita without going through the process of extracting the image in Adobe Acrobat, so that was already a time-saver. Not every art app can directly open a PDF. Just open Krita, go to File>Open and search for your file. 

Once open, go to Filter>Colors>Colors to Alpha. You'll see a pop-up color picker. I don't know what that does yet...I just leave it on default. Click Ok and you'll have black lineart on a transparent layer.

Here's a close-up at about 200% zoom. Look at how great that is!! It seriously took longer to write about it than it did to do it. Maybe there's an easy way to do the same thing in Photoshop but I haven't found it yet. I've tried using Channels but that just doesn't quite work for me. There are still some stray marks and some of the paper texture is still visible if you look really closely. Overall, though, I think this might become a regular part of my art arsenal. And for FREE! I cannot emphasize that enough! Digital art should be accessible and apps like this really help level the playing field.  

Will you try Krita? Should I color in this lovely lady and learn how to use Krita at the same time? The answer is OF COURSE I should, so stay tuned for that. 

And thank you to Paperdoll Review for this beautiful freebie!  Happy coloring :)


Friday, January 3, 2025

Wrap-Up 2024: Paperdoll Review Projects

Happy New Year! 2025 feels like some sci-fi year set in the far-flung flying car days of the future. It's not really real, I guess. I mean it is, obviously. My kids laugh at me when I get like this and talk about "the late 1900s" just to annoy me! 

Today I'm back into normal routine mode with the first of several wrap-up posts. I like sharing what I've done and what my (very loosely defined) goals are for the year. This post is a few of my favorite projects for Paperdoll Review. 

Every single year I am THRILLED that I get to work on all of these wonderful projects. 2024 marked five years of working with Jenny and publishing my books with her. She's a dear friend. The whole community is just a joyful part of my life. I am grateful every day to be a part of it.

Ok, enough sappiness. On to the projects.

These are all of the paperdoll books of 2024! If you get the Paperdoll Review newsletter, you'll see that I shamelessly swiped this image from that!! And if you aren't subscribed to the newsletter, you can subscribe here (scroll to the bottom of the page, in the left-hand column). For more fun, check out the reel on Facebook here. I want to share a few of my favorites - even though I love them all!!

This year, I colored two books drawn by Brenda Sneathen Mattox. The Princesses of Wales and Bridal Fashions of the 1920s and 1930s.

I'm a little nervous every time I color line art from another artist. I want the line art to shine! David Wolfe really gave me the confidence to take on these kinds of projects. Collaborating on his books, his advice, and his belief that I could do this sits at the forefront of my thoughts every time I color a book. 

Both of these books were edited in Photoshop and colored in Procreate, with additional elements edited in Illustrator.  

One project that just grabbed my attention instantly was Kwei-lin Lum's Jazz Baby. Her art is so inventive and vibrant! She had a very clear vision for the covers and I used that as inspiration for the interior layouts. We collaborated on the stereo on the cover - she had an idea of what she wanted and I worked it up in Illustrator, then added the textures in Photoshop. The fashions in this book are just totally stunning. I LOVE this book so much! 

Dan DeSantis's first book from Paperdoll Review, Cairo Pemberton, is another one of those projects I was in love with instantly. His art is so beautiful! He also had a clear vision for this book, with fully designed covers and colors ready to go for the borders. This project was mostly image extraction and clean-up on my end, with title treatments. Every page is lovely and I'm looking forward to working on more of Dan's books. 

Finally, I want to highlight two books that were very special to me this year, Ralph Hodgden's Ann Blyth and Rapunzel


Ralph is a legend in the paper doll world. His knowledge of the glamorous era of Hollywood is unparalleled. And his art is breathtaking in its detail. These are the first two books he's published with Paperdoll Review despite a long career as a self-published artist. He's been kind and encouraging in my growth as an artist and it's a privilege for me to edit his art into book form. Expect more books and prints from Ralph in the future. Jenny invited me to join her on a trip to Boston to see Ralph and gather up some of his art for publication. It's high on my 2025 goals list!      

I could write endlessly about each and every book from 2024. Every book that I work on feels like the best book ever, every time! I love editing art for other paper doll artists. If I've done it well, you don't know I've done anything at all. 

In my next post, I'll share my projects from 2024 and what my goals are for 2025. 


Friday, October 20, 2023

Creating a Morticia Addams Paper Doll

Recently, Paperdoll Review published its Spooky issue (you can order a copy here) and I knew exactly what I wanted to tackle - Morticia Addams! Is there any ghoul more glamorous than Tish?! I think not!!


I've always been mildly obsessed with the Addams Family. As a kid, I watched reruns of the old TV show after school.  Then in 1991, there was The Addams Family movie. To say I love this movie is an understatement. I have seen it over a hundred times. At one point, I had ALL of the dialog memorized. I had magazines devoted to the making of the film, complete with costume close-ups. I lived for this movie. I still watch it at least once a year. And I lovingly sketched the characters as an utterly devoted 12 year old...


Just look at that ambitious hand lettering! Some of the detail is lost - the pencil is very shiny and some of it has rubbed off. But still, I was very proud of that drawing for a long time. So I took another crack at it, 30 years later! 

For Paperdoll Review, I knew there were a few problems I needed to solve. It was difficult to find reference images so these are my own interpretations of the movie costumes. 

First, I wanted it to be a vertical format so I knew my canvas would be at least letter sized (8.5 x 11 inches) at 300dpi. I never work at less than 300dpi. Second, I needed to make this work as a paper doll. The bottom of the dress takes up a bit of space so I didn't want to redraw that & take up a ton of area on the page. So I settled on three interchangeable tops. I especially liked that idea because then I could do expressive things with her hands. Third, I need to tackle the color problem - black. SO MUCH BLACK. I decided on throwing in purples to break it up. And finally, composition. How can I arrange this on the page and make it interesting? Initially I thought about creating a conservatory/glass background but that felt really busy. I also thought about a grey background but that felt too monochrome. I found a spiderweb frame in Adobe Stock's free collection and played around with black or white in Illustrator. I settled on white with a gradient of purple (from the costumes) and a bit of pink (from the lipstick color).


Once I figured out my parameters, I started sketching. I like sketching on paper instead of a device. I can work out solutions faster and looser on paper. Then, I take a quick picture of it and tinker in Photoshop. I like to create my document size, margins, and edit my sketch before taking it into Procreate. You could just as easily take a picture with the iPad and skip all of that just make sure that you import your photo into a 300dpi file! It's no fun finding out that you rendered everything at 72dpi. Trust me!!

In Photoshop, I combined the arm and hand sketches from the first sketch with the dress from the second sketch. This could just as easily be done traditionally with tracing paper or a light table. I'm a big fan of using what you have - I have Photoshop, so that's what I use. Once I'm happy with the sketch, I take it into Procreate. The purple lines on the image above are my sketch lines in Procreate. I draw on paper, arrange, and then draw a second sketch digitally.

The other thing about this paper doll is that I wanted it to look a bit like Anjelica Huston. It's not a perfect portrait - I struggle with portraits - but it has that vibe. Here's a screenshot from Procreate where I worked on the face at a larger size. This doesn't show all of the reference images I used! Once I was happy with it, I duplicated it and popped it in place on the doll. 

After the secondary sketch is good, I line it in pure black. I really like the technical pen in Procreate (it's a default brush) for outlining. I don't always use it but I do most of the time. I make sure my lines are fully closed. Gaps can cause headaches later.

Here are the lines, with the blending mode set to Soft Light, on a grey background. Why do it this way? Well, I like the look of color lines (like Tom Tierney or Marilyn Henry or Brenda Sneathen Mattox). I have found that clean, black lines set to Soft Light will give me the colors that I want. The line layer has to be the top layer and everything is colored underneath it. And I'm not a fan of working on white so most of the time, I work on a grey tone.

Next, I color in stages, on layers. I blocked in the black of the dress - which is NOT pure black! It's a medium-dark grey because I needed value range for the shadows and highlights. Once I blocked in the color, I set the layer to alpha lock and shaded. Using this setting allows me to color JUST the black and not worry about stray marks or coloring outside of my lines.


I repeat those steps for the skin, details, and hair. It's how I render everything, actually. I used to put EVERY SINGLE COLOR on a separate layer but Procreate limits the amount of layers available according to file size (so a 600dpi file has fewer layers, etc). I've had to get a lot better about layer management! 

I'm also a big fan of groups. The layers of the base doll go in a group folder. Each outfit goes in a group folder. The one thing I miss in Procreate as compared to Photoshop or other programs is that I can't change the opacity of a group. I'll often make a copy of my base doll lineart and use that to draw all of the clothing. 

After rendering everything in Procreate, I add tabs, border, and finish the layout in Photoshop.

Once I settled on the purple & pink gradient, all I could think of was Addams Family Values:

The whole thing took me close to 11 hours. Procreate records a time-lapse video as I draw and that's helped me get better about estimating the time I put into a project. There's the drawing on paper, Photoshop, Procreate, and then Photoshop again. 

I've added the time-lapse video here. It's about 10 minutes covering my 9+ hours of drawing. You can see where I use reference images and how I'm solving problems on the fly!  Let me know what you think of Morticia!


Monday, October 16, 2023

Everything Eighties Paper Doll

Things have been nuts around here!! The kids are having a great time at school so that's good. My mother just had her second total knee replacement and I've been helping her through that. It went really well, thankfully.

Aside from that, I have another new book out at Paperdoll Review - Everything Eighties


If this looks familiar it's because I used my holiday paper doll from last year. I loved that doll so much that I just HAD to expand her into a whole book. This one had some of my favorite things - denim, glitter, and over-the-top patterns. 

Most of my work has been in Procreate which defaults to recording each file so now I have these neat videos of my projects! I took the video of one page (Prairie Style) and sped it up about 7 times so that I could get it under a minute. It's kinda fun to go back and see what I did! 

I'm also going to share a couple of Halloween themed things later in the month, so watch for that!


Wednesday, September 13, 2023

Current Projects and Updates

 I don't really mean to go months in between posts! There are a few reasons. First, posting here requires time & effort that I just haven't had lately. Summer is always a challenge for me. The kids are home (which I love) but that takes a lot of time. It's amazing how many meals a tween boy and a teen boy can eat in a summer day!! I have always been very aware of the fact that my time with my kids is short, so I prioritize it. We go to museums, swimming at the lake, visiting friends & family, and we almost always take a vacation at the end of August. This year, we went to Paris. It was amazing! 

Look at my adorable little family at the Louvre! 
 
The second thing that has happened is that my paper doll world has gone from mostly virtual to mostly IRL. I have so many virtual paper doll friends that I've met in real life (Rachel and Melissa among them!!) and that's been great. I started attending paper doll parties in 2018, starting with my local group, and then Morgantown in 2019. That first Morgantown was a blast and I met Jenny Taliadoros - the amazing, wonderful, terrific person behind Paperdoll Review. We've been working closely together ever since. And I COULD NOT be happier! So I have my hands in a lot of projects and sometimes I forget to share them here. I try to share them on Instagram but I'll admit, social media is not something I really focus on.  I have a couple of books coming out soon and I try to have art in every issue of Paperdoll Review Magazine. I'll try to get better about sharing things like that.

This is one of the books I have coming out. "Sisters at Heart" is a tribute to real-life friends Sharry & Laura. It's a lovely book that I'm very proud of - every time I see it, I forget that I made it!! It looks too good to be mine! You can order a copy here.  

I also have a submission in the Spooky issue of Paperdoll Review. Here's a preview - see if you can figure out what I sent in!

Another reason I'm posting less is because I'm trying to find time to improve my art. I've been watching tutorials, drawing more, and just plain practicing! Also, my youngest son and I have been attending a local drawing workshop a couple of times a month. We have the option of drawing a clothed figure or a still-life. I've been encouraging him to draw more, so we usually draw the still-life together. We're both LOVING it! 

Mile's still-life. He knows I shared this and he's fine with it :)
My still-life. It's been great putting pencil to paper again! 

Finally, I've become more wary of posting my art online. Some of it is that I don't want to feed the AI my art. That's not all of it, but I do think about it. I've also had my art stolen over the years (who hasn't at this point?!) and it's frustrating. Stealing art & scraping art for the algorithms devalues the work that I do AND the work of all creatives. I'd rather focus my time and effort on books for Jenny or other physical products. I don't think I'll ever completely stop posting online despite the frustrations.

The blog isn't going away. I just can't promise that I'll post four times a month anytime soon!


Friday, January 14, 2022

Paper Doll Convention and Paper Doll Kits


As of this moment, the 2022 Paper Doll Convention is still on. I'll be there! Sure, I still need to book a room and a flight, but my plan is to be there!! In my 12 years as a mother I haven't spent more than 72 hours alone and the last time I did, it was at the Morgantown paper doll party in 2019. It's time that Mom here got a break.  If you, too, want to hang out with rad paper doll people, you can get all of the information here.

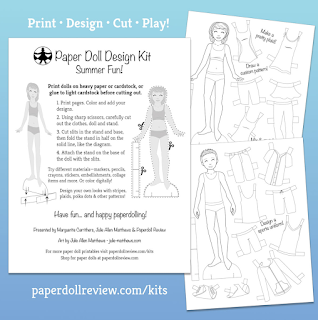
The other thing I want to share today are a few paper doll kits that are available FREE over at Paperdoll Review.  I worked with Jenny Taliadoros and Marguerite Carrithers to put together several paper doll kits during a time when so many of us were stuck at home & needed a little fun in our lives! I have previews for three of them, but there are six available at Paperdoll Review.

I have two kits available - one in color and one in black & white. There's a boy & a girl from my tween series. Both kits feature mix & match wardrobes which we all know I just LOVE to make! 


The next kit I want to share is by the utterly amazing Jim Howard. I would have gone nuts for this as a kid! It features two of his ultra sophisticated fashion models with both color and black & white wardrobes. 


Finally, the last kit I want to share is from a 1980s book by Tom Tierney. This set also features two dolls and a glorious '80s wardrobe. Really, really fun! 

There are also kits by David Wolfe and Alina Kolluri that are every bit as terrific as the ones I mentioned here. Grab all of them for free here and happy coloring and playing!

Thursday, June 18, 2020

Eight is Great!

I know I don't write much anymore. Truthfully, caregiving for two generations and homeschooling during a pandemic has been a been overwhelming. And though I don't draw as much as I'd like, I'm still busy in the world of paper dolls.

Today is the eight year anniversary of the ol' blog and I didn't want it to go unmentioned. In a lot of ways, this blog is closely tied to my kiddos.


Without explicitly saying it at the time, I started this to help me deal with post-partum depression and being overwhelmed as a stay-at-home mom to two boys. What started out as something to keep me sane became something bigger. My digital world of paper dolls became a real world of paper dolls. I am forever grateful for that! If you can, meet real live paper doll people. They are the BEST people. After the pandemic, of course!!

I want to say that the blog isn't going anywhere. I don't write as much as I once did but that's because of all the "real world" stuff. I've had oodles of fun paper doll projects in the works and today I want to share a few of them.


Aprons Paper Doll by Judy M Johnson
Aprons Paper Doll Book by Judy M Johnson preview

First up is a vintage inspired paper doll book by Judy M Johnson.  I was lucky enough to do a bit of editing and page & cover design for this one. There are so many cool things about this book! My favorite, though, is the back cover. I was lucky enough to create the kitchen illustration on the back & I'm pretty happy with how it came out! The whole book is just retro fantastic!


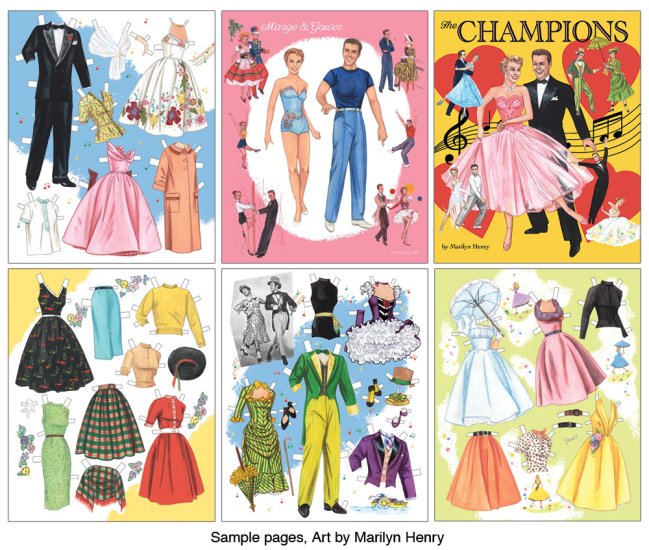
The Champions Paper Doll Book by Marilyn Henry
The Champions Paper Doll Book by Marilyn Henry preview

This was another really cool project to work on! Marilyn Henry painted these images a while ago and I was able to edit the scans as well as work on page layouts and covers. It's such lovely art and it was a real joy helping to bring in into book form.


Victorian Sports Paper Doll Book by Brenda Sneathen Mattox
Victorian Sports Paper Doll Book by Brenda Sneathen Mattox preview

Choosing a favorite paper doll artist is like choosing a favorite child - I couldn't possibly! However, if I had to, Brenda Sneathen Mattox would be at the top! I love her beautiful watercolors and this book is no exception. Every illustration is just exquisite. This one, too, I worked on some editing and page & cover design. On a technical level, I'm incredibly proud of the way the two illustrations are blended together on the front cover. Masks...love layer masks in Photoshop!!

Choosing the perfect font or illustration to compliment a book is immensely satisfying. I love collaborating with Jenny Taliadoros on this. It's been a privilege to be a part of her very talented paper doll team. All because I took the leap and went to Morgantown! Although it seems like all of 2020 is cancelled, paper dolls aren't cancelled. In fact, it's a great time to start or add to a collection! I know I am! So check in occasionally - I'll write when I can. Thanks for sticking with me so far and happy paperdolling!