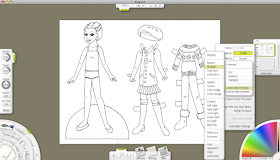
Anyway, today we're going to look at ArtRage, a natural media program. For anyone who's new to this, a natural media program mimics the look and feel of traditional media. There are a number of programs out there that do this, but ArtRage is the only one I've really used extensively. It's great for a number of reasons. The interface is easy to use. The tools are great at what they're supposed to do -- crayons behave the way I would expect, oils blend the way I would expect, etc. And the price is amazing. I have an old copy of ArtRage 2 that I picked up ages ago for $20. They have four versions available right now: an iPhone app, an iPad app, and two PC/Mac versions for about $30 and $50 each. Not bad considering Corel Painter goes for $250 at the moment. (It's a more robust program, and I'm not knocking it. I'm just saying ArtRage is a great program at a great price.)
So enough about the awesomeness of ArtRage, let's use it!
This is the interface. On the left are the tools and tool menu. On the right are the layers palette and colors palette. On the top is zoom, minimize, and maximize. And on the bottom are stencils and other tools I have yet to master. If you want a more thorough understanding of all these tools, check out the ArtRage tutorials on their site, as well as a good old Google search. You can reposition those palettes by grabbing the green handle and dragging them where you want them. I'm a dive-in-and-swim kind of person, so I just fiddled around til I figured stuff out. I will say this: the keyboard shortcuts are very different than those used in Adobe programs. I've learned a few (which I'll share) but there are plenty more left to learn. Also, if you have input tablet (Wacom or otherwise) it's awesome with ArtRage.
I've already prepared a doll for this lesson. I have a doll that I inked and cleaned up a bit in Photoshop. To place it in ArtRage, go to File>Import Image.
There's a nice variety of tools in ArtRage, and today I want to look at the crayon tool. Another great thing about ArtRage is that all of the tools can work together. If you want to try to smear crayons with the palette knife, go for it. If you want to use the roller on glitter, that's fine. Pencils over oils, etc. Anything you can think of. I used the markers recently to complete a project and was very happy with it.
This is a close-up of the coloring in progress. To zoom in and out, use Command (or Control) and the plus or minus signs. To change the size of your brush, use the left and right arrow keys. Brush sizes are percentages and not points the way they are in Photoshop. Also, if you want to open a color panel like I have pictured, go to Tools>Show Color Panel. There are a few palettes available. I'm using the Crayola-style pack from =bolsterstone at deviantArt. Love it!
Here are the colors for the head. Because these tools work much like regular crayons, I'm able to do a little blending. I took the pink from the lips and decreased the pressure on the tool menu palette (on the left). I changed it to about 25% but do what feels right. That made the color a little more transparent. I put that on the cheeks and blended it in with the same color I used for the skintone. Again, I kept the pressure of that color around 25%. I did this to the eyes and lips as well.
This is the doll. I put the base on its own layer. The way ArtRage works is that color on a layer blends together. If you don't want that to happen, create a new layer.
And here's everything colored in. I used the crayon and the techniques described above for all of it. ArtRage has lots more features that I didn't cover. There's a metallic option for colors. It's fantastic with the oil paint tool. There's also glitter which is fun. There are also innumerable paper options available, too. Overall, a great program for drawing or painting.
And it has some great export options. You can export as a layered PSD. I exported it as a jpg for this final image. Play around with the program. It's easy to use and so satisfying!
I don't know exactly what the next lesson will be but I'll try to get it up on Monday. Check back Friday for the new doll download.


No comments:
Post a Comment
Comments post after approval