Materials List:
Prismacolor Pencils
Verithin pencils
Pencil sharpener
Pencil & eraser
Tortillion blender
Colorless blending pencil
Colorless blending marker
Masking Tape
Archival Pens
Ruler
For this project, I used all of the listed materials except the blending marker.
As usual, copy your doll onto your final paper. I use my old standby: my lightbox. For this doll, I stuck to just two outfits & the doll. Be careful tracing the image. It's easy to press to forcefully and "etch" into the watercolor paper and that could be noticeable under the colored pencil later.
Once your images are copied onto your final paper, erase your pencil lines until they are relatively faint. This image is my outlines before erasing - the image after erasing was too faint to use this time.
After erasing the lines, I take the Verithin (hard) colored pencils and outline the doll and outfits in the colors I intended on coloring them. I often try to outline parts of the doll in coordinating colors. Some artist prefer a black outline on everything, or no outline at all. Just a preference….
I now have a rough idea of what colors I want to use, so at this point I start blocking in colors with the Prismacolor soft core pencils. I like to work one color at a time. The image looks really rough right now but blending and layering will help smooth everything out.
From this point on, I'll be focusing on the paper doll image. I'll complete the outfits as well, but for the sake of demonstration, I'll just color the doll.
Here, I've taken the colorless blending pencil and colored over the initial color block in one direction. Then, I put the same color over the blended color, and used the colorless blending pencil in the opposite direction. It creates a cross-hatching effect at this point. There's more layering and blending to come.
To smooth out the hatching in the previous step I've taken the blending pencil and colored in vertical strokes. It doesn't totally eliminate the texture, it just evens it out a bit. I am leaving the details, such as the face, till the end.
Now that the initial colors have been laid down and blending sufficiently, I start shading. I like to take darker shades of the same color and use that as my shadow color. I use a light brown for the skintones and dark purples for the suit and base. To create black shoes, I used the 90% Grey pencil instead of black and then used black as the shadow on the shoes.
It's time to blend the shadows and instead of using the blending pencil, I'm using the original color. For example, on the skintone, I use the original peach color to blend the light brown. It gives a subtle blend to the colors that the colorless blender did not.
I decided to darken the shadows, so at this point I colored the shadows with the dark colors again and reblended with the lighter color.
The majority of the color has been laid down, layered, and blended, so now I go back to the face and hair and color those. For the white reflection of the eye, I leave that uncolored. Use a very sharp pencil for the details. I again chose to blend with similar colors for the face instead of using the colorless blending pencil.
The initial outlines I made with the Verithin pencils have been obscured by layers of pencil, so I take the soft core pencils and outline my image. Use a very sharp pencil and draw slowly & carefully.
Here I've added some details to the suit, hair, and face. I thought a little ribbon & lace might be nice, so I drew those in with blue. At this stage, I refine the shadows and outlines to finalize the image. It's easy to overwork an image and this seemed like a good stopping point.
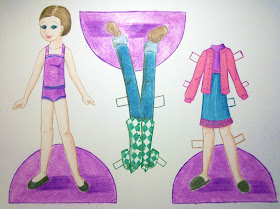
The final image shows the doll and two outfits. Colored pencils can leave a sheen on the paper and that's what happened with the middle outfit: the light I used to photograph the final image bounced off that center part for some reason. Still, you can see the overall method for using colored pencil.
I do not claim to be an expert with colored pencil. If there's an expert out there, I would have to point you to Liana's lovely paper doll site. She's been a bit busy lately with a new baby (I can totally relate!) so she hasn't updated in a while. Still, check out her previous work. I could only hope to achieve her level of skill!
Next up for us, watercolors. This is what I normally use to color my paper dolls and it's one of my favorite methods. We'll have a basic overview of materials next week, with the first watercolor lesson after that. For now, happy creating!


No comments:
Post a Comment
Comments post after approval