Tuesday, February 26, 2013

Hand-Drawn Seamless Patterns Using Photoshop

Today's tutorial was supposed to go up yesterday.  I had planned on writing it during my youngest son's nap.  He decided napping was not on HIS schedule.  Oh well.  Here it is today.

What we'll be doing today is taking a hand-drawn image and creating a seamless repeating pattern in Photoshop.  This can be done in Illustrator, too, with a slightly different method.

Materials List:
Small partial pattern drawing (I did mine using black pens & markers)
Adobe Photoshop
Adobe Illustrator

To begin with, I took a square piece of paper and drew a random patter in one quarter of it.

Once your drawing is completed, scan it and open it in Photoshop.  I used the Levels menu to tweak the colors.  Go to Image > Adjustments > Levels.   Select the white eyedropper (on the far right) and click the DARKEST section of white in your image.  This will make everything that color or lighter white.  Take the black eyedropper and click on the darkest spot in your drawing.  That will make your drawing essentially black & white.  Delete the white portion so that you only have the black image.  I add a layer underneath that's white so I can see it a bit better.

The next step is to start copying and rotating the image.  Duplicate the layer and start rotating.  I find holding shift helps - it constrains the rotation.  I tried using the transform and flip functions, but found that eyeballing it worked well enough.  If you want a precise pattern, Illustrator is a better way to go.  I'm looking for a hand-drawn image with all it's imperfections.

Next, I want to fill in some of the white spots where the patterns meet.  Again, this is supposed to be hand-drawn so it doesn't have to be perfect.

Here's the image with the white patches filled in.  The next part of this tutorial is an adaptation of a tutorial I read about a while ago.  Find out how big your image is and divide it in half.  My image, for instance, is 1756 px.  Half of that is 878 px.  You'll need that number in the Offset Filter.

Go to Filter > Other > Offset.  Put the value for half your image (in my case, 878 px) in both the horizontal and vertical spots.  The image you get will look something like the next image.


Now I want to blend all of these separate sections a little bit better. You can do a couple of things here.  Print out your image and and draw in the white sections, then rescan and combine your images.  You can cut & paste in Photoshop.  Or draw directly in Photoshop.  I chose to use Photoshop only.

I've filled in some of those white spaces here.  I chose to cut & paste some of the elements already in the image.  Merge any layers and select the entire image.  Go to Edit > Define Pattern to create a pattern swatch.

To demonstrate how the pattern looks, I opened a Photoshop file of the doll and added the pattern.  I selected the section I wanted to place the pattern, created a new layer, and set that layer to the Soft Light blending mode.

Your pattern can be anything.  Black & white, color, hand-painted, etc.  It can be as simple or as complex as you'd like.  The Offset filter is the key to the whole process.  Once you have a seamless pattern in Photoshop, it's easy to take it into Illustrator.

Open your image in Illustrator.  Live Trace your image.  Make sure to select Ignore White.  Click Expand and then drag the whole image into your swatches panel.  That's it!

This is the pattern in Illustrator.  I rotated the pattern 45 degrees so that it created a diamond pattern.  With one hand-drawn image, you get a Photoshop pattern and an Illustrator pattern.  Nice little two for one package!

This tutorial uses a few of the lesser know Photoshop features.  Any questions, let me know.  And there's a special doll to download on Friday!


Friday, February 22, 2013

Fashion Friday - Laura

Today's fashion doll is Laura.  I was inspired to make a prairie style dress & immediately thought of Little House on the Prairie.  My mom watched it a lot when I was a kid, and wore some prairie style outfits in the '70s herself.  So Laura Ingalls Wilder as a namesake felt right.

There will be a new lesson on Monday.  The project I've been working on is almost finished & I might post a preview of that, too.

Enjoy the doll! 

paperdoll school fashion friday paper doll directions sheet


Laura - Fashion Friday Paper Doll


Download Fashion Friday - Laura pdf here

Thursday, February 14, 2013

Fashion Friday (Thursday Edition) - Cara

I'm posting the Friday doll today.  I made a Valentine's themed doll and I have plans on Friday, so I figured I'd post it a day early.  Her name is Cara, which means "beloved" in Latin, and I love the name.

So here she is.  Enjoy.  And have a lovely Valentine's Day :)

paperdoll school fashion friday paper doll directions sheet


Cara - Fashion Friday Paper Doll


Download Fashion Friday - Cara pdf here


Monday, February 11, 2013

Self-Publishing: Creating Covers and Uploading Files

First things first: I feel terrible about my Chinese New Year doll debacle.  I can't believe it took three tries to get the Year of the Snake right.  Lesson learned :)

Speaking of lessons, this is my 100th post.  Yay!  As long as I have something to write about or share that is paper doll related, I'll keep writing.  This blog has been a fun way to connect with fellow paper doll fans.  It's also kept me on task, which can be a real challenge when staying home with two (very delightful) kids.  My oldest son is actually sitting next to me right now playing Temple Run on my tablet.  He's fascinated by Mommy's tech gadgets....

Today's lesson is the conclusion of how to self-publish on Lulu.com.  It's another long one. We'll use templates to create the back & front covers and go through the upload process on the site.  I'll even share some photos of my published dolls at the end.

I mentioned in one of the previous posts that Lulu has templates available.  We'll be using the letter sized, full color templates.  Just a note: when I upload these files, I'll be using the black and white option.  I usually use full color (and I sure most of you would, too).  Keep that in mind later on.

Let's start with the front cover.  The Lulu front cover template is a .png files which is compatible with most (if not all) photo editing software.  I'm using Photoshop.  The Lulu front cover files is already set to 300dpi, so anything we create using it should already be set up to print.

Here's the front cover template.  The .png file is transparent, so I added a white background to make it easier to see.  The template shows a live area, trim area, and document size.  The live area is the area of the file that is guaranteed to print.  Important words or images should be fully contained in the live area.  The trim area is what the book will be cut down to after it's published and bound.  The document size is the total dimensions your file.  Background color or images should go all the way to this edge (full bleed).

Now comes the fun part.  Create your cover.  I like to have images that show what's inside (obviously).  Be sure to include your title and author information!


This is my cover.  Save your cover as a flat image (.jpg or .png work best).  Notice that I left plenty of space around my title box and that all of my images go all the way to the edge.

Next up is the back cover.  This template includes all of the information from the front template as well as a spot where the UPC code would go.  I like to put the doll on the back cover.  If someone wants to cut out their doll, this is stiffer material than the pages and would potentially stand up better.

Open up the back cover template and the doll file you have prepared.

Here's the back cover in progress.  Notice that the UPC area overlaps the foot of the doll.  Chances are, this would be fine but it's better to fix this.  I'll move the doll slightly to the right and everything should work out fine.  On my Goddess paper doll, I had to resize the doll and every outfit to fit the pages and back cover.  That was the first doll I published and quite a learning process!  So trust me, fix this now.


This is the finalized back cover.  Moving the doll gave me some space to add instructions, which is a nice little bonus.  When you finalize your covers, be sure to delete the Lulu template layer!

So we have the front and back covers, as well as a finalized PDF for the interior pages.  Now we need to create the book.

Publishing a book on Lulu.com is free.  All you need to do is sign up.  They require your full name, a user name, and a password.  That's it.


This is what your My Lulu project dashboard page looks like.  You can find all of your projects here, as well as revenue.  You can buy your own dolls from this page and create revisions as well.  The left side and bottom of the page offer a variety of helpful links if you have a question.  On the left side of the page there is a section called Start a Project.  Click on the Paperback link to get started.

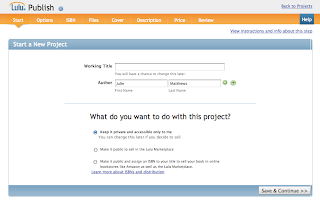
Here's the first of several project screens.  The first blank is for the title of your book.  The second line is the author, and this automatically fills in from the full name you provided at registration.  Under this, there are three options for your book: private, public on Lulu, and public with an ISBN.  Selecting private makes the book available only for you, which is nice for personal projects.  the second option makes the book available just on Lulu.com and by direct link.  The third option is to assign it an ISBN and sell it on Lulu.com as well as wider distribution (including Amazon).  Personally, I never use the second option.  I assign an ISBN to all of my books.  I don't always use the wider distribution, but it's nice to know that the option is available if I want it.

Once you fill in the title, author, and privacy selection, you'll see the project options page (see image above).  This is where you decide the book size, paper, binding, and black & white or color.  We decided all of this BEFORE the project so that creating the project would be easier! Because I like to have the flexibility to distribute far and wide, I always choose standard paper, US letter sized, perfect bound, and either color or black & white (usually color).  Make your choices and click Save and Continue.

The next page is for choosing an ISBN number.  I always choose the first one.  I don't know enough about ISBN to explain buying one on your own, so I use the ISBN Lulu.com can provide.

This is the ISBN barcode.  Download it.  Open it in Photoshop or Illustrator or whatever program you're using.  Create a page the same size as your interior pages and add the barcode to the lower left.  Save the page as a PDF and insert it into your interior PDF.  Include copyright information and make this the LAST page in your pdf.

That's my copyright page.  I always make it the same.  I like to keep things consistent!


This screen is where you upload your completed PDF for the interior pages.  There's a handy FAQ about making PDF files linked from this screen if you need it, too.  Be patient.  It can take a few minutes to fully upload the file.  Once it's uploaded, click on the Make Print-Ready File button at the bottom of the screen.  On the screen that follows, you have the option to download the print-ready PDF.  It feels kind of silly to download the PDF that you just uploaded, but do it.  And review it.  It will help you catch any potential mistakes.  Remember, you're not just the artist or author.  You're the editor and last line of defense against mistakes.  Trust me.  Every book I've posted has had some flaw, major or minor.  Review!!

Once your interior pages are loaded, it's on to the covers.  Lulu has some pre-designed options available, but I like to design my own.


On the Themes tab, select Image Only (its' the first option).  If you created your covers with the text already in place, this is the option you want.  Click on the orange Add Images button on the right side of the page and load your images.  Drag your images from the right sidebar to the black cover images in the middle.  The back cover is on the left, and the front cover is on the right.  Click on Make Print-Ready File and continue on.  This can take a little time to load.  Click Save and Continue when it's done.

Now you get to describe your book.  Choose a category, keywords, and write a description.  You also need to fill in copyright information, license, edition, and publisher.  I always select Standard Copyright.  I retain the rights to my work.  You can choose other options, but research what those options first.  This is the first edition of the book, so that line is easy.  And I just use my name as the publisher.


The final step is setting your price.  You have a minimum price you need to list and then you can set your price anywhere above that.  It also tells you what commission you'll receive if the book sells through Lulu.com or through other channels.  After you set your price, you get to review the book.


This is your review page.  Click Save and Finish if everything looks good.


Here's your confirmation page.  If you want to sell your books on Amazon or other retailers, you need to choose a distribution package and you can do that here or from your Project Dashboard.  As I've said a couple of times, it's free to publish on Lulu.com.  If you want to distribute your book using their extendedREACH or globalREACH options, you need to purchase a proof copy for review.


The three pictures above are from a proof copy of my Paper Doll School yearbook.  It's really a beautiful book.  All of the books I've published through Lulu have been great.  The site is easy to use and the end product is great.

If you have any questions about the tutorials or publishing on Lulu, let me know.  These have been three very long tutorials but I hope they're helpful.  Having said that, I'm working on a new paper doll for OPDAG's next Paper Doll Studio issue.  I have a little over two weeks to finish it (yikes!!) so I won't be posting a tutorial next week.  I'll still post the Friday dolls.


Friday, February 8, 2013

Fashion Friday - Mei-Lin

Chinese New Year is coming up and I thought it would be fun to do an Asian-inspired doll.  This set is a little less matched than other ones.  I'm pretty happy with the patterns.  I found some Asian vector symbols and colored them, then created a seamless pattern in Illustrator.  I may post a set of this to download later on.

So celebrate the beginning of the Year of the Dragon Dog Snake (maybe? I dunno. I can't seem to find a consensus) on Sunday... If you can manage to dig out by then.  I'm in northeastern MA and we're looking at 2 feet or better of snow.  Fun!!

paperdoll school fashion friday paper doll directions sheet


Mei-Lin - Fashion Friday Paper Doll


Tuesday, February 5, 2013

Self-Publishing: Setting Up Files

This lesson is a day late and super long. Things have been crazy lately.  In the last 6 months, my mother's entire family (parents, sister and her kids) have moved to the same town as my mom.  I've helped with some of the moving both times and I was just too beat on Monday to write :)  Luckily, I feel a bit more energetic today.  There's a saying that beer is proof that God loves us (which I agree with because I love beer) but I think it may be more true of coffee!

Anyway, for today's lesson we're going to prep files for Lulu.com.  You'll need a completed doll to do this.  Make sure your doll is at least 300dpi (dots per inch), whether scanned or digital.  With my watercolor dolls, I often scan at a very high dpi (like 600) and reduce them down to 300.  Scaling down produces a fairly crisp image, while scaling up blurs an image.  And keep in mind that 300dpi is the standard for most printed material so if you ever choose to print your doll any other way, it will already be prepared for it.

Most of my digital dolls are created in Illustrator, so to get the 300dpi image, I change the export settings.  I'm going to assume that most people reading this will be working with Photoshop or a similar image editing program.  If anyone has specific questions about Illustrator, I will happily answer them.

Keep in mind your margins.  There is a maximum printable area that you can fill on each page and on the covers.  There are templates available on the Lulu site here.   I create US letter sized books, perfect bound, full color.  That file is the third one from the top of the list.  The zip file includes a per-formatted Word document, and a back and front cover file.  We aren't creating a written book, so I don't use the Word file in this lesson.  If you have a text-heavy book, use the Word file.

Let's open a file and look at it.  I'm using the black & white doll I created in December because it's already been edited.  I don't plan on actually publishing this doll because the pdf is already available as a free download.  But it's perfect for walking through the process.


First, determine your image size.  To do this in Photoshop, go to Image>Image Size.  A menu pops up that show the width and height in pixels, the document size in inches, and the resolution.  The document size and resolution are the important numbers here.  My document is 8.5 inches by 11 inches, with a resolution of 299.999 pixels per inch.  For our purposes, pixels per inch and dots per inch are the same thing.  So my document is correctly sized and the correct resolution for the book I want to make. If your doll is NOT the appropriate size and resolution, there are a few things you can do.  First, you can create a new document set to letter size and copy & paste your images into a new file.  Or, if you want to do a little math, you can change the dimensions of your original image.

To change the dimensions of your canvas (your paper size), go to Image>Canvas Size.  A menu pops up with the the current document size as well as a width and height (filled in with 0s), and a diagram of where the canvas will extend.  So let's say that your canvas is 8 by 10 inches, and you need it to be 8.5 by 11 inches.  In the width box, type in 0.5 and in the height, type in 1.  The default measurement is inches, and the default extension is all around.  The document will now have an extra 0.25 inches on each side and an extra 0.5 inches on the top and bottom.

The next thing to check are the margins.  To do this, I like to create guides.  If your started your doll from scratch or importing images to a new document, you can set your margins at the beginning.  I've determined that a 0.5 inch margin is sufficient.  This just means that no text or images should come within a half inch of the edge of the paper.  I looked at the front & back cover templates, as well as the Word document and concluded that half an inch would work, so that's what I use when I create all of my dolls now.


Adding guidelines in Photoshop is super easy (this works the same way in Illustrator).  There should be rulers at the top and left of the image.  If not, go to View>Rulers and make sure it's checked off.  Not sure what unit of measure is being used on the rulers? Double-click anywhere on the ruler and a menu will pop up and show you the unit of measure.  The document is automatically aligned so that the top and left start at zero.  Click and drag a guideline from the ruler to the spot you want the guide to go.  For our purposes, we need one at the half inch mark and the 8 inch mark on the width of the page, as well as the half inch mark and 10.5 inch mark on the height.  My image has a border that isn't fully contained within the "safe" zone we've created with the margins.  I'm going to let it go because I'm not bringing this all the way to print.  Keep this in mind if you created borders or backgrounds on your images.

So far, we've determined that our image is the correct size, resolution, and falls within the correct margins.  The next thing to do is create a title page.  Same rules apply: 8.5 by 11 inches, 300 dpi, and it needs to fall withing the half inch margins.  If you want a sense of what belongs on a title page, open any book.  It's usually the first page.  I include the title and author name, and not much else.  If you decide to publish as an entity (ie, Paper Doll School Publishing), you would include that here, too.


This is a super simple title page I whipped up in Photoshop.  A title, author, and my website.  Pretty straight forward.  Create any additional pages at this stage as well.  Does your doll require directions? Create that page.  Or an introductory page.  Anything you might want to include.  Also remember the page minimums we talked about in the last lesson.  This doll has 31 outfits and the title page.  If I wanted to, I could combine outfits on each page and reduce the page number.  I try to keep my books to the 32 page minimum.  That makes for a reasonably sized (and priced) project.

One last page we need to create is a blank pdf page.  We'll use this blank.pdf page as the back of the images.

The last thing we'll do today is create the pdf.  There are tutorials out there for how to create pdfs with various programs.  I have Adobe Acrobat Pro CS4 installed on my Mac.  If it would be helpful, I can find out how to do all this in Windows with the pdf programs available in that format.


Open Acrobat.  Select File>Create PDF>Merge Files into a Single PDF.  Once you do that, a new menu pops.  Click on the Add Files button and add the files you want to merge.


There is an interested quirk in Acrobat - file numbering.  I named my files outfit1.png, outfit2.png, etc.  When Acrobat reads them, it places outfit1.png first, followed by outfit10.png.

You can see the numbering in the image above.  You can move files around in Acrobat if page order is important.  I'm not going to bother because this is a fake project :) Combining all the files takes a few minutes so be patient.


This is a screenshot of the pdf once it's combined.  If we uploaded this to Lulu now, the first outfit would be the first page of the book, and outfits would print back & front.  We need to insert the title page and the blank pages.  Again, this take a little time and it's a little tedious, but it's the best way I can think of to do it.

Go to Document>Insert Pages to add the title page and blank pages.  If the page you want to add is already a pdf, it will show up in the menu.  If it is not, select your files type from the drop-down menu.  Mine was title.png, so I selected the png format, and inserted it before the first page.


This is the method I use to insert the blank pages as well.  Instead of selecting the first page, select the Page option at the bottom of this menu and either Before or After from the Location menu.  For example,  I want the back of the title page to be blank.  I select the blank.pdf file and place it after Page 1.  That's it.  Do this for all of the pages except the last page.  You'll add an ISBN and copyright page here.  We'll go over that next time.


Here's the prepared pdf file.  There is a title page, then a blank page, then an outfit, then a blank, etc.  The final page should be an outfit.

Next time we'll wrap up self-publishing.  We'll create back and front covers, create a copyright page with an ISBN number, and upload the pdf to Lulu.com.  Til then, there will be a doll on Friday.


Friday, February 1, 2013

OPDAG's Circus Issue

The latest issue of Paper Doll Studio, published by OPDAG, arrived today.  I have a circus doll featured next to the amazing work of Tom Tierney.  I'm half-tempted to frame this just for that reason!!  See for yourself, in my grainy, low-res picture:

It's silly, I know, but it means the world to me to have my art next to his.  I think nearly every paper doll artist of my generation feels awed and inspired by the man.  I like the background that was added to my doll.  I don't use a lot of backgrounds or borders and I have often thought that I should.

Again, since this blog is all about technique, here's how I made the circus doll.  First, some inspiration.  My husband recommended I look at Cirque du Soleil.  I liked the idea of an element themed performer.  The base is air, the green outfit is earth, the red is fire, and the blue is water/ice.  I also wanted a watercolor doll.  I love creating digital work, but sometimes I need a brush in hand.  I wanted some sparkles and had a hard time achieving that, so I added some with Photoshop.  To do that, I created a seamless glitter texture using ArtRage and Photoshop.  Maybe I'll make that a lesson later on.

Here are the dolls to print should you choose to.  I'm thrilled with the way they turned out and the artists featured in the magazine are always an inspiration.


Fashion Friday - Ruby

Happy February folks!  Here's the Fashion Friday doll.  I gave her a sort of vintage hair style and some neutral/sepia colors.  I'm not sure why, but I named her after my great-grandmother.  From what my own grandmother has told me, Ruby was a tough woman.  She raised 4 kids during the Depression in northern Vermont and there are some great sepia photos of her in a rustic prairie style dress washing dishes in a basin.  Anyway, I guess this was partly inspired by those.  Enjoy!
paperdoll school fashion friday paper doll directions sheet

Ruby - Fashion Friday Paper Doll