Monday, July 30, 2012

Alternate Transfer Methods - Charcoal

First, let me apologize for missing the Friday post.  It was not my best day :) Anyway, here's the lesson for today: 

We'll finish up on transfer methods today.  It's super messy charcoal, so keep that in mind as you begin.

Material list:
Charcoal or dark pastels
Paper, pencil, eraser
Masking tape
Photocopied template

I learned how to do this in 6th grade, so really anyone can manage it! And I've been using it ever since…

Step 1:
First, tape a sheet of paper to your drawing surface, just like with the carbon paper.


Step 2:
Next, take a photocopied template and cover the back of it with charcoal or a dark pastel.  Make the layer thick enough that it will leave a mark when you draw on top of it.


Step 3:
Again, I would suggest taping the template over the blank paper.  Just makes for an easier transfer. Draw directly on the photocopy so that the charcoal transfers to the blank paper below.

 
This is the final result.  The lines are a little darker than in the carbon paper method.  They are also harder to erase.  I find this method works ok, especially in short runs.  Overall, I use the lightbox or photocopy methods the most.  The photocopy (printer) method comes in handy when working digitally, which we'll talk about during the digital lessons.

Next up, we'll start transferring our templates to final paper and coloring them using various techniques.  The first will be colored pencil using two methods, then watercolors.  Maybe even a mixture of both!


Tuesday, July 24, 2012

Garden Fairy Paper Doll


My most recent paper doll -- a garden fairy -- is online & available for purchase at Lulu.com.  It should be available from Amazon in a few weeks as well.  This doll features 16 hand-painted watercolor dresses based on a nature theme.  There are three of my favorites in the preview above.  It took several months to complete this project...and now it's time for the NEXT project! Not quite sure what that will be yet.  I'd love suggestions.  For now, enjoy the fairy doll!

Monday, July 23, 2012

Alternate Transfer Methods - Carbon Paper

Today we'll take the photocopy from the last lesson and use it for the carbon transfer method.  Next week we'll finish up with the charcoal transfer.

Method B: Carbon Paper Transfer
Materials list:
Carbon paper
Pencil, paper, eraser
Masking tape
Photocopied template

Carbon paper can be very easily found.  I bought my roll at a craft store years ago, but it can also be found on Amazon.  It's also called transfer paper.

Step 1:
First, tape your paper to a hard surface, like a table or drawing board.  The paper needs to stay in one spot for this to be effective.


Step 2:
Then, lay a sheet of carbon paper over your blank paper.  Tape this down as well.  It's really important that every sheet is secure so that you get the most accurate transfer possible.


Step 3:
Now place your photocopied template on top of the carbon paper.  I use a photocopy here so that the original drawing isn't damaged.  I'm really protective about originals!


Step 4:
Draw directly on the photocopy.  No need for extreme pressure, but you should draw firmly enough that it presses through the carbon paper to the blank paper below.  I sometimes use the same carbon paper sheet a couple of times to trace outfits.  Just be sure to reposition it slightly so that you're drawing on carbon paper and not the blank lines left over from previous transfers.


This image shows the carbon lines.  They are very, very faint.  Certainly enough to work with, but a challenge to photograph.


Here's a close-up of a carbon transfer.  It's faint but manageable.  The carbon transfer method is effective but tedious, in my opinion.  After every transfer, the carbon paper needs to be repositioned and a new template taped over it.  The photocopy templates wear out fairly quickly, too.  Still, few materials are needed and it's not messy at all so the method has its uses.  But if messy is what you want, we'll be using lots of charcoal in the next lesson!

Monday, July 16, 2012

Alternate Transfer Methods - Photocopy

In this lesson, we're going to go over three other transfer methods: photocopying, carbon paper, and charcoal transfer.  We'll go over photocopying first since that will be used in the other two methods as well.

Materials list:
Doll template
Computer with scanner OR a photocopier
Clear tape
Pencil, printer paper, eraser
OPTIONAL: fine tip colored marker or pen

Step 1:
First, take a copy of your doll.  We'll be lining up multiple copies of the doll on one sheet of paper to create a master sheet.

Step 2:
For my doll, I can only fit two templates per standard sheet of paper.  I take the photocopy and tape it to the original doll, trying to align the bottoms of the bases.  No need to be perfect here.  Once you have the dolls taped on to a sheet of paper, copy that sheet.  This becomes the master sheet.


Step 3:
Copy the master sheet as many times as needed.  I draw my outfits directly on this sheet at this point.

Step 4:
Once I draw my outfits, I like to trace them in another color (either with a fine marker or pen).  I used an archival red pen.  This is a little easier to see when tracing the outfits on to your final paper or for scanning outfits in to work with digitally.

Now that we have a master photocopy, we're going to use it to try out carbon paper transfer and charcoal transfer. Next lesson will cover carbon paper transfer.

Friday, July 13, 2012

Fashion Doll Friday - Olivia

Little late today.... Took the boys swimming at my sister's pool.  It's gorgeous here in New England! Honestly forgot about my post altogether :)  Anyway, here it is:


Monday, July 9, 2012

Outfits, Tabs, and Themes

Today we'll go over outfit design, tabs, and themes.  Our "lesson" doll is going to be a generic fashion doll, so that's our theme. 

Material list:
Outfit templates
Paper, pencil, eraser
Pen, archival pen preferred

To begin with, have your outfit templates ready to go.  I have 2 pages of full-body templates, 1 page of just tops and 2 pages of just bottoms.  I'll have 4 full-body outfits & 6 mix-and-match outfits when we're done.  To make the top & bottom templates, I trace out the appropriate area on the doll and that's it.  No need to include more really.

Sometimes I'm feeling super inspired and the costumes just come out easily.  Sometimes I need a little inspiration.  I have a fashion book that I frequently reference for inspiration: 9Heads: A Guide to Drawing Fashion.  It's a pricey book but full of helpful illustrations and tips for modern fashion drawing.  I also like to look at books about the history of costume.  These are easier to find and most libraries have a couple of books that would qualify.

After you draw your outfits, add tabs to secure your outfits to your doll.  I typically place tabs at the shoulders and waist so that the outfit stays in place, and then I add tabs to any other places that might need extra securing.  I usually just use a rectangular tab but there are two other methods I use: something I call a tuck tab & a hat cut-out.

A tuck tab (outlined in red) is a tab that I outline in a dashed line to indicate that it is placed behind the doll NOT folded over the doll.  In this case, I felt the collar needed extra securing that a regular tab couldn't really manage.  When I color the tuck tab, I'll make it the same color as the neck.  That will help it blend in with the doll.
To make a hat (or sometimes a wig), I use a dashed line to indicate that the hat has an opening cut into it.  I also added a tab to this hat to help secure it to the doll's head.  When adding a cut line for the opening, make sure the line doesn't completely cut the hat in half.  The cut needs to be long enough for the head to fit through, but shouldn't extend all the way to the edges.  Double check this when you get to the coloring stage.

I try to have a plan for each of my dolls.  Sometimes the plan is as simple as creating a "fashion doll", like the doll we're working on.  Sometimes it's a bit more elaborate.  For instance, I wanted to create a doll about careers, so I made the Grow-Up Paper Doll.
I needed to decide how many pages I wanted, which careers, and how to best represent them.  I settled on 3 sheets of watercolor paper (which could be further broken up with one outfit per page later on in an editing program) and then I selected the careers I wanted to represent.

One very simple theme I tried out was a one-page angel doll.  I've since added a new page to this doll around the holidays every year.
And an elaborate doll I created was a Goddess paper doll.  This doll took me several years to complete but once it was, I loved it so much that I self-published it (more on publishing to come in a later lesson).  The key to publishing this was meeting a minimum page limit and I had to plan around that.
Goddess Paper Doll available on Amazon.com

Before we move on to different coloring methods for paper dolls, we're going to backtrack just a bit and talk about alternate transfer methods.  We'll cover photocopying, carbon paper, and charcoal transfer.

Friday, July 6, 2012

Fashion Doll Friday - Chloe

Every Friday, I'll post a one-page paper doll to download. The files are PDFs & are free for personal use.  Every Fashion Doll Friday doll has interchangeable outfits.


Wednesday, July 4, 2012

Independence Doll

I thought it would be fun to create a one-page doll for the 4th of July.  It's a doll I've been playing around with anyway.  The idea was to create a doll completely using Adobe Illustrator - no drawing, just Illustrator.  The doll came out great so I adapted it to this project.  The final doll, however, DID begin with initial sketches!

The doll is based on American colonial clothing, and the outfit on the right is based on French Revolution fashions.  Download & have a happy 4th!

Monday, July 2, 2012

Creating Clothing Templates

Tracing a doll is one of the easiest methods for creating a paper doll and very low-tech.  As a child, I created dolls using a window, a little sunlight, and some masking tape.  It really doesn't get any easier than that!  After I got a lightbox, it became indispensable.  I still use the same lightbox 15 years later.  The method for using a window versus a lightbox are the same with minor variations, which I will detail after the window method.

Method A: Using a window
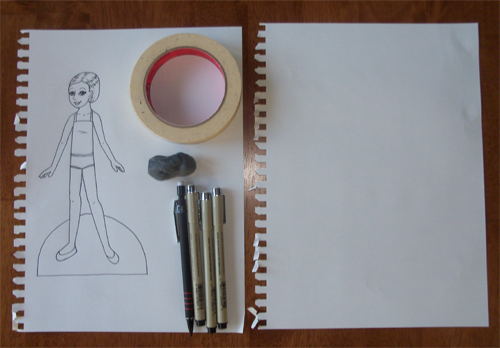
Materials list:
Window & sunlight
Masking tape
Paper, pencil, eraser
Doll template
Pen, archival art pen preferred


Step 1:
Find a window that will fit your paper and remember you WILL get fingerprints on it!  Moderate sunlight works best.  Too much light can be as bad as too little.  Attach your template to the window using a lightweight masking tape.   


Step 2:
Next, tape your drawing paper over the template.  Your paper should be heavy enough to draw on, but thin enough to see through.  Standard printing paper works well.  I like to use sketchbook paper.  I like to fit as many templates as possible on one sheet so I tend to work on horizontal paper.  Also, if using a base, I try to line up the bottom of the base with the edge of the paper.  One less line to draw that way!


Step 3:
Trace your doll template.  There's no need to trace every detail, so skip tracing the features of the face, etc.  Trace the outline of the figure and the doll's base outfit.  Trace enough of the doll so that creating clothing and tabs will be possible.  As for tracing, try to be as accurate as possible.  A better clothing template will make for a better fit later on, especially if you choose not to retouch/edit your doll digitally.

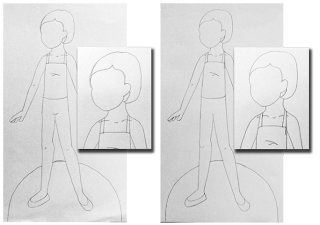
Below, there's an image of a completed template.  In this case, I traced the outlines of the body, hair, and base, as well as the lines of the shoes, base clothing, and anatomy lines such as knees and collar bones. 

In the final image below, I have two templates on my paper.  My doll has a wide base and I could only fit two dolls per sheet.  Each doll is different and the size of your drawing paper will determine the amount of templates per page.  Create as many template sheets as you want for your completed doll.


Method B: Using a Lightbox
Materials list:
Masking tape
Paper, pencil, eraser
Doll template
Pen, archival art pen preferred
Lightbox


Basically, the process is the same when using a lightbox.  One thing to keep in mind is paper size.  Working on a 10x12 lightbox with 16x20 paper is just not going to work well…

Step 1:
Tape your doll template to the lightbox.

Step 2:
Tape your paper for tracing over the doll template.

Step 3:
Trace as accurately as possible. My lightbox has a dimmer switch so I can check the accuracy of my tracing. Reposition the paper on your lightbox as needed to trace out as many templates as you want. 


There are a few advantages to using a lightbox:

1) Portability.
You can use a lightbox basically anywhere you can plug it in.  My lightbox is 10x12 inches.  Lightboxes come in a variety of sizes so you can choose the one that works best for you.

2) Work the Way You Want
I like to sit down to draw.  Using the window method requires me to stand at a window with my arms raised is a sometimes awkward manner.  With the lightbox, I can lay it flat on my lap and draw at the couch, or prop it up at an angle on a hard surface. There's a lot of flexibility available.

3) Consistent light
If you work at a window enough times, you'll realize that sunlight changes.  Maybe a storm rolls in or a cloud passes the sun: it's perfect lighting one minute and then it isn't.  A lighbox is always the same.  Also, I've never had to replace the bulb in my lightbox and I've had it for 15 or so years.  Sure, I don't use it every day, but that's still a great advantage. 

4) Accuracy
Because drawing on the lightbox is a more natural drawing position for me, I find the accuracy of my tracing is a bit better.

Window method on the left, lightbox on the right
Next time, the real fun begins.  I'll discuss how I draw outfits & place tabs, as well as ideas for developing ideas and themes for your doll's wardrobe.